Conductor Installation
After downloading the ISO, use the procedure in Creating a Bootable USB to create a bootable USB.
The steps in this section describe the interactive conductor installation from the packaged-based ISO, using the serial console. The section Initialize the Conductor describes using the Initializer to configure the system as a Conductor after installing using the interactive installation.
The Conductor installation must be completed before installing a Session Smart Router or routers using the ISO. The same ISO is used for both installations.
Prerequisites
- Installation is performed on a compliant platform; see Compliant SSR Hardware.
- Verify that the boot priority of the USB drive is properly listed in the system BIOS.
- Ensure local console connectivity to the device.
- Logging in as
rootover SSH is not permitted. When a system is installed using the OTP ISO, at128user is configured withsudoprivileges.
Installation
Connect the SSR to a Management Console
Ensure that you have an appropriate rollover cable available to connect to your computer. The SSR has a console port (CONSOLE) with an RJ-45 connector. Use the console port to connect the appliance to a management console or to a console server. The baud rate of the console port is 115200 bps.
- Connect the RJ45 rollover cable to the console port on the SSR device.
- Connect the other end of the cable to your computer.
- Insert your bootable USB with the new ISO image into the USB port of the SSR device.
- Connect the power input to the SSR device.
- Power on the SSR.
Boot from the USB
Use the steps appropriate for your device to direct the device to boot from the USB.
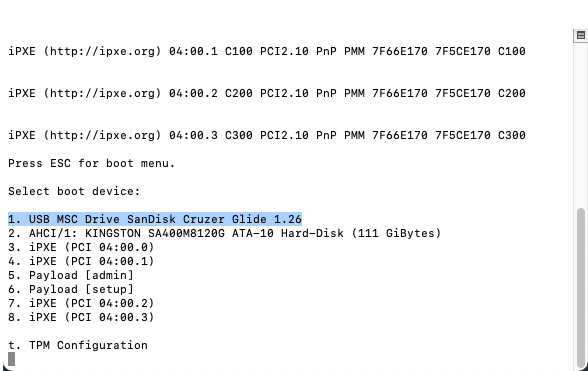
SSR100 Series Devices
-
At the instruction in the terminal window:
Press ESC for boot menu, do so.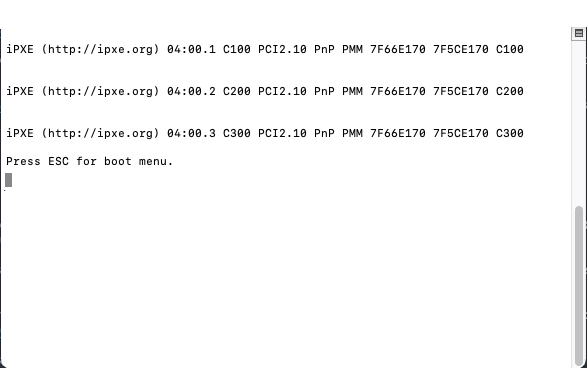
-
From the boot menu, enter the boot device number corresponding to the USB, and press Enter.
-
When the USB installer boot menu is displayed, proceed with the installation section below.
SSR1000 Series Devices
-
At the instruction in the terminal window:
Press <Tab> or <DEL> to enter Setup, do so.
-
When the Setup Utility window appears, use the left and right arrow keys to navigate to the
Save & Exittab.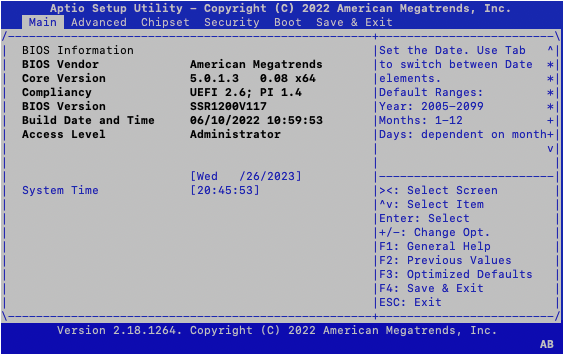
-
Use the up and down arrow keys to highlight the USB device in the Boot Override list.
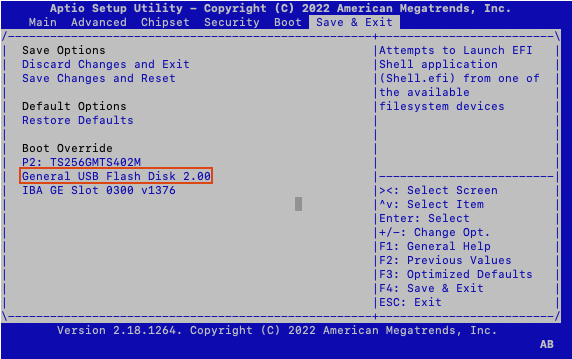
-
Press Enter to confirm boot from the USB device.
-
When the USB installer boot menu is displayed, proceed with the installation section below.
Conductor Installation
Upon boot, the following screen is displayed. The default selection is booting to the serial console (115200 baud). You must manually choose the installation process suited for your environment.
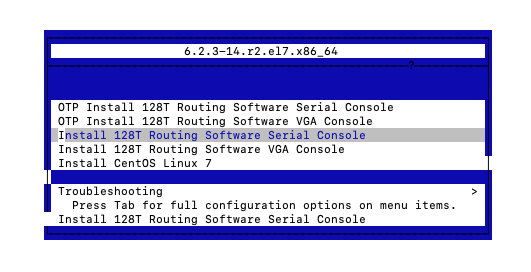
- Use the Up/Down keys to select the
Install 128T Routing Software Serial Consoleoption. This is the supported installation option for Common Criteria. It uses/dev/ttyS0115200 baud as the serial console for interacting with the installer.
Selecting the wrong type of console (Serial or VGA) may result in garbled characters being displayed. If allowed to continue it will result in an incorrect installation. If the wrong console is selected, reboot the target system and select the correct line for the target hardware.
For serial console issues please refer to Serial Console Troubleshooting.
- Press the TAB key to edit the configuration.
To enable FIPS Enforcement for SSR software version 6.2.5-5r2, add the fips=1 kernel option to the kernel command line during system installation as shown in the steps below. This ensures that key generation is done with FIPS approved algorithms and continuous monitoring tests in place.
FIPS mode is required for Common Criteria compliance. Failure to configure FIPS mode, or the use of any other cryptographic engine nullifies compliance.
- Add
fips=1to the end of thevmlinuzparameters.
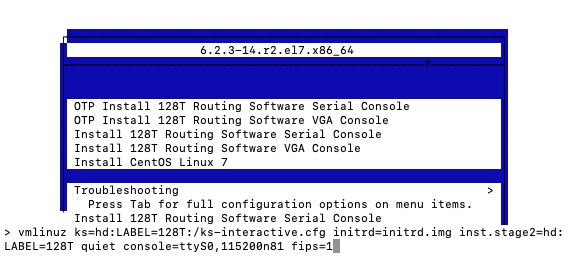
- Press Enter to start the installation.
After the Linux installation is complete, the SSR software installation begins. Note that this may take several minutes to complete (up to 40 minutes). After the process has completed, the following screen is displayed:
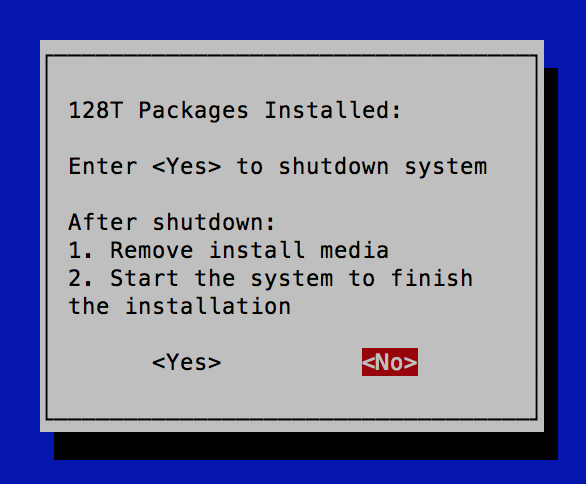
Select <Yes> to shut down the system. Remove the USB device, then power the system up to complete the installation process.
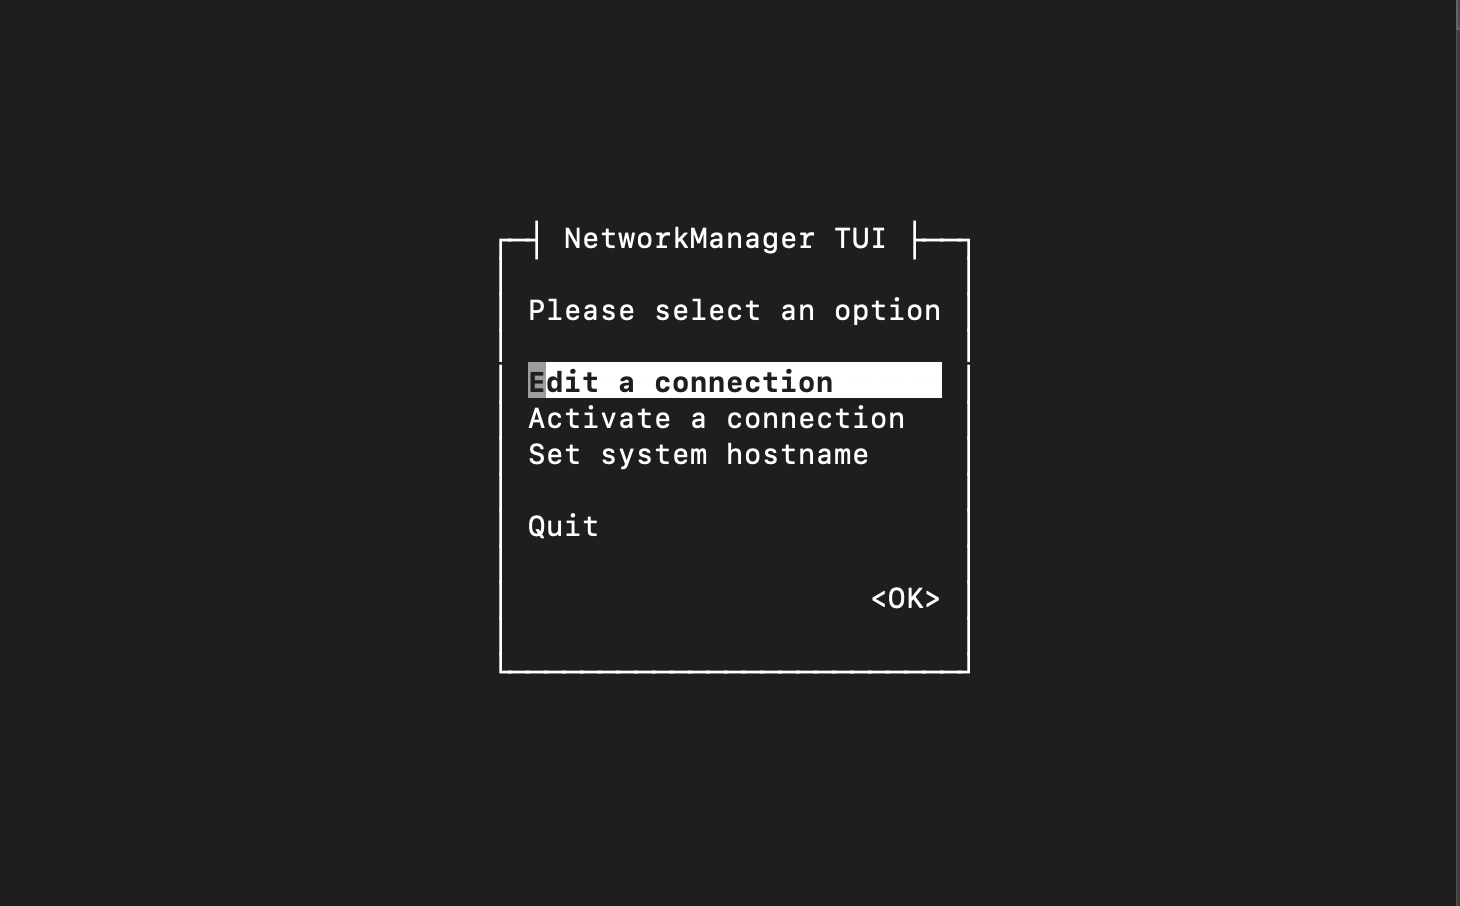
Initial Boot and Management Network Configuration
When the system boots from the Install 128T Routing Software... Interactive Installation work flow, the system asks whether to configure initial Linux Networking before the SSR Initializer is started.
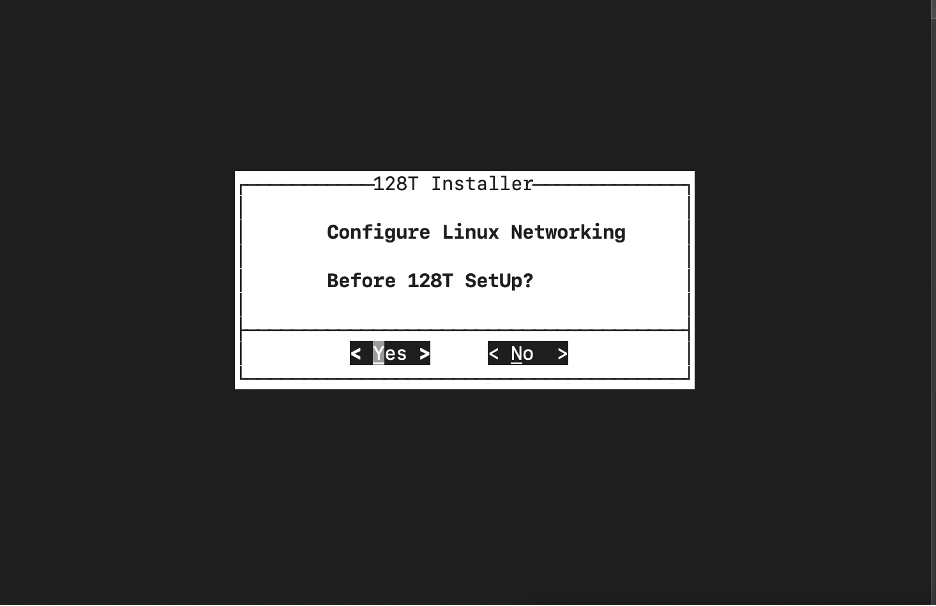
Selecting Yes launches the NMTUI application to perform an initial network interface setup.
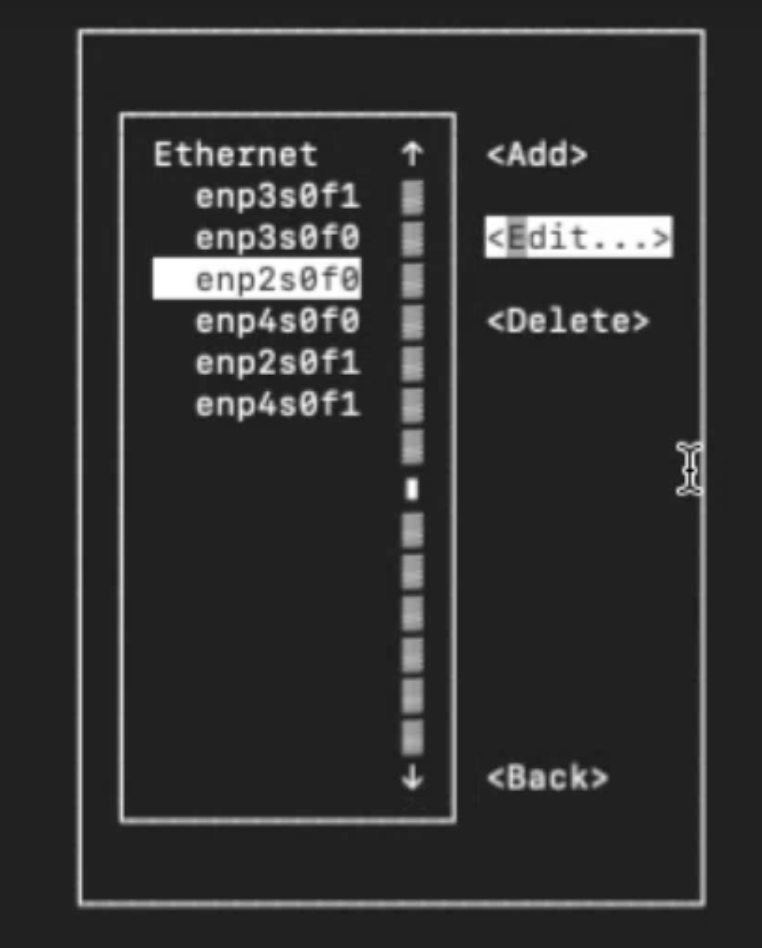
Configure the Network Interface
Configure the IP address that will be used to manage the network routers.
- Select the device ethernet interface that corresponds to the management port for your Conductor and select
<Edit>
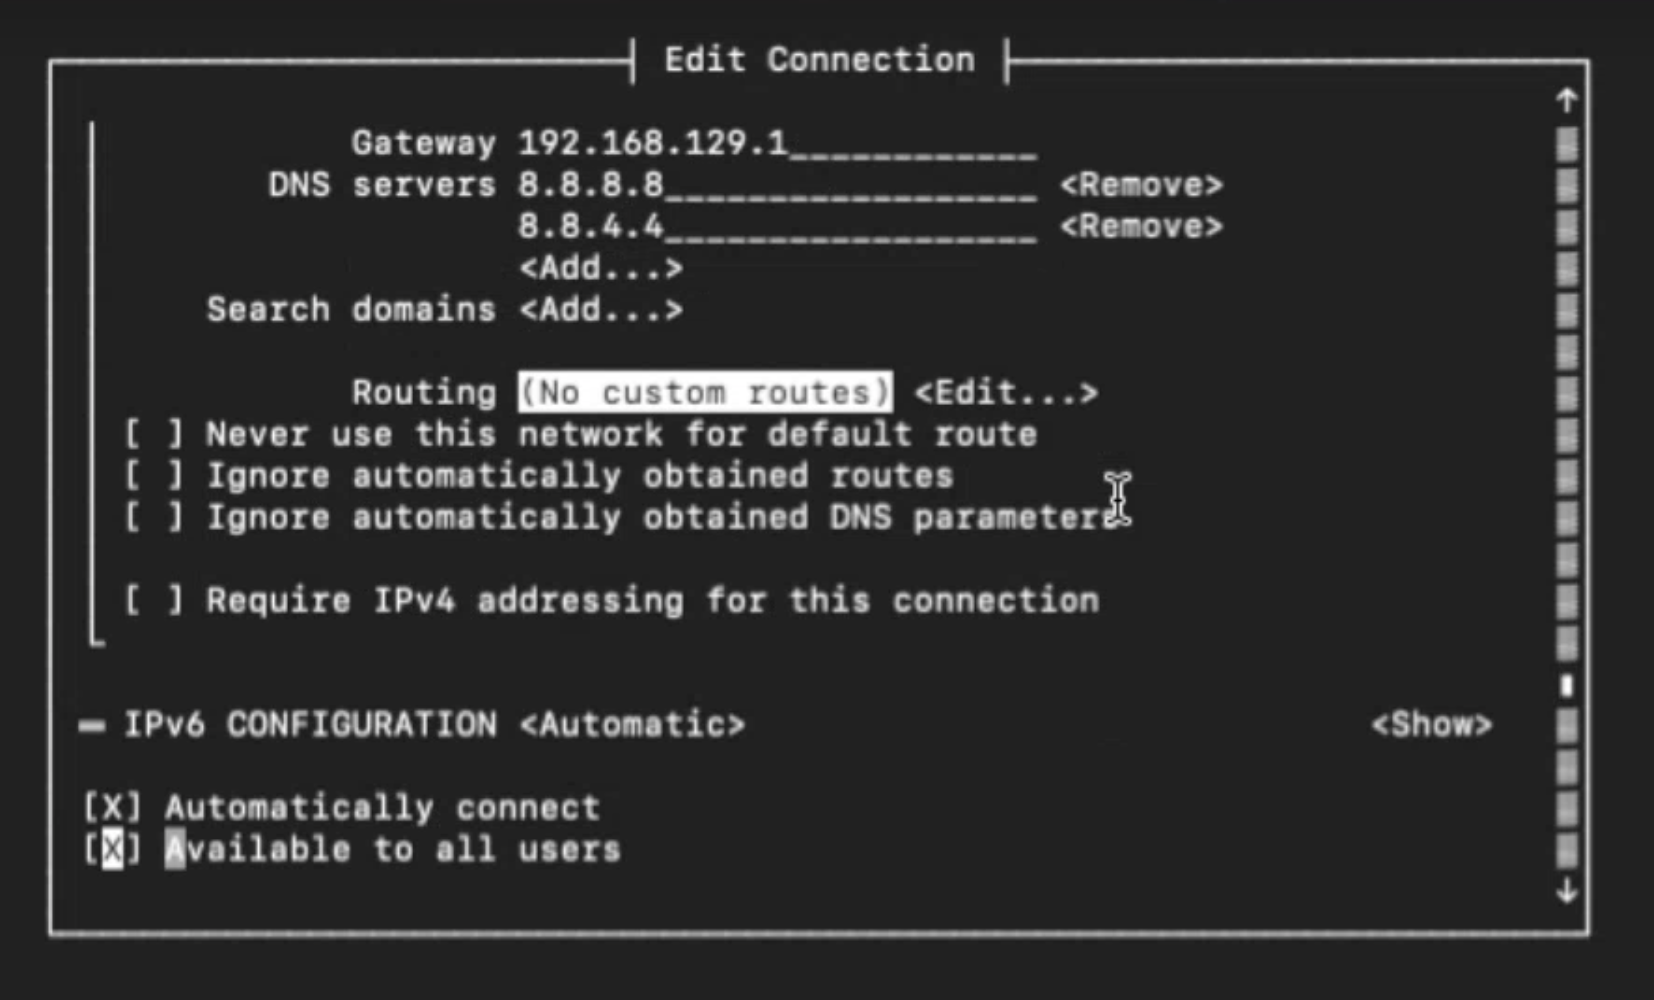
- In the Edit Connection screen, configure the following:
- The IP address for the port
- the Gateway IP address
- DNS server addresses

- Scroll to the bottom of the screen and select
Automatically ConnectandAvailable to All Users, then select OK.
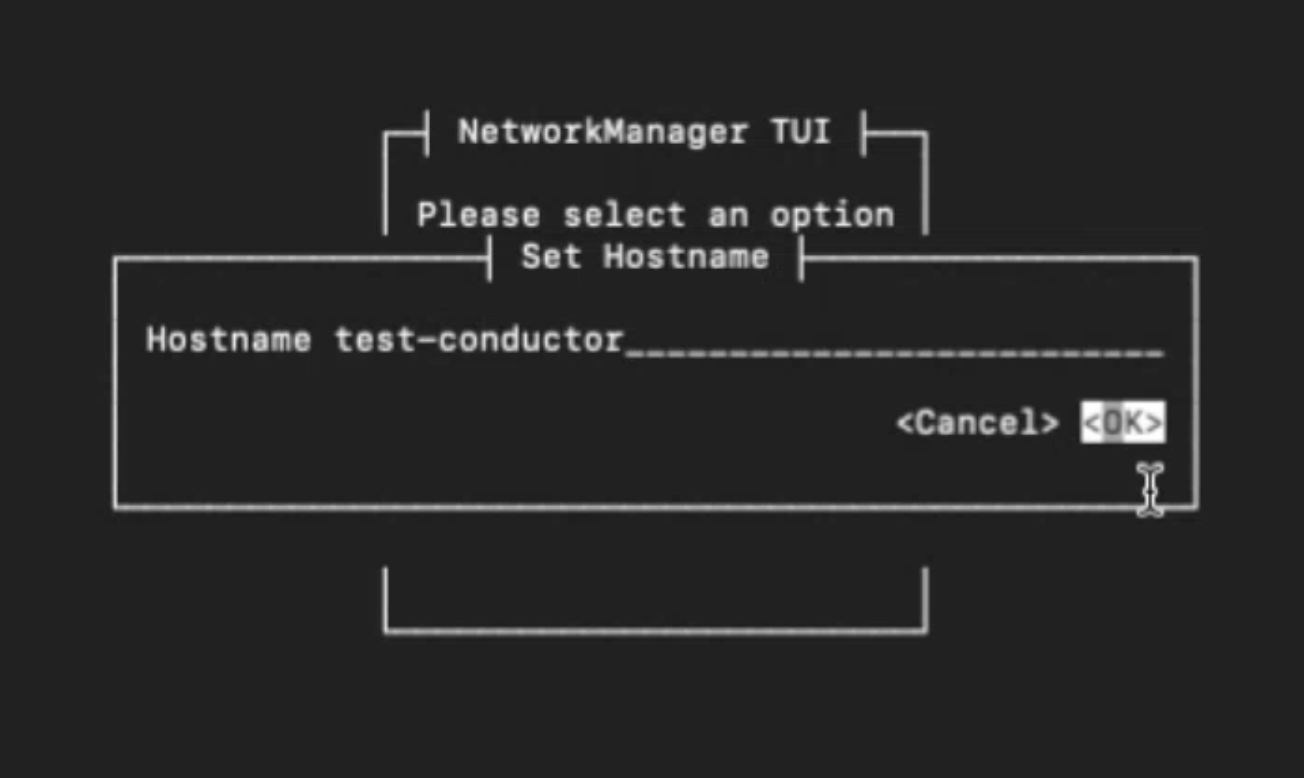
- From the NMTUI screen, select
Set system hostname, and<OK>.
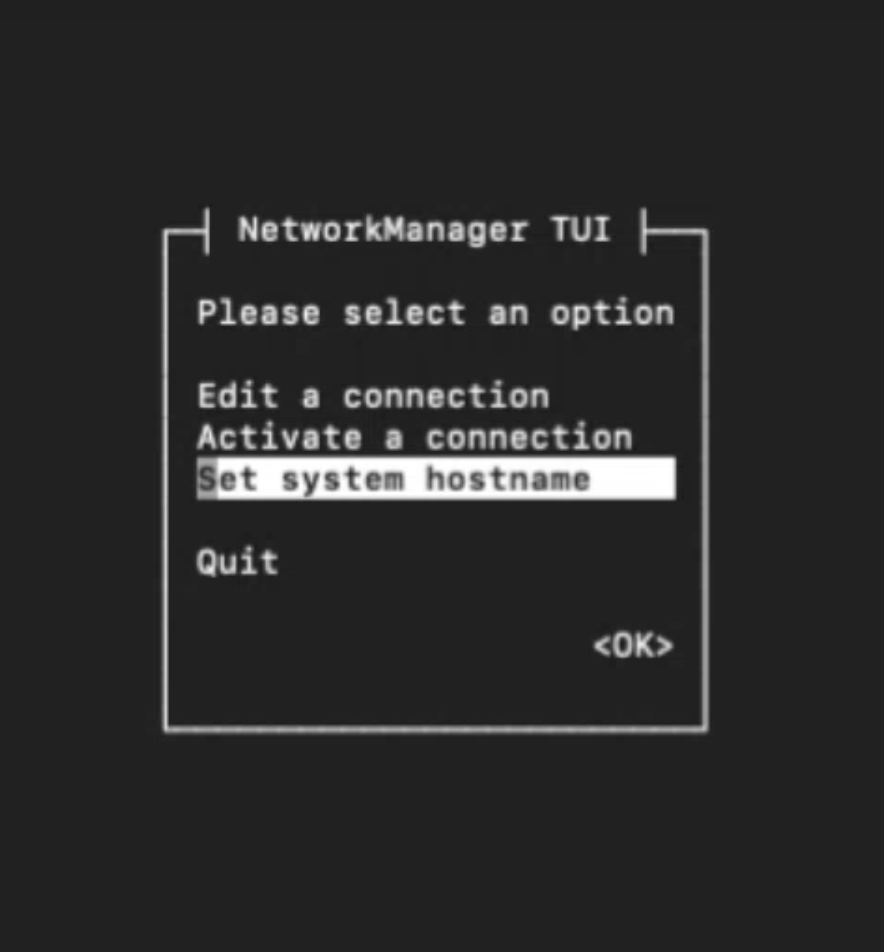
- Enter the hostname and select
<OK>. Note that the hostname will be used as the Asset ID.
When the port has been activated, an asterisk will appear next to the port name.
Ethernet (enp2s0f0)
* enp2s0f0
- Select
<Back>and then<Quit>NMTUI.
The Initializer process starts automatically.
Initialize the Conductor Node
The SSR Initializer tunes your operating system, prepares the platform to run the SSR software, and creates the bootstrapping files necessary to load the software. The Initializer is launched on first boot.
There are two different types of conductor installations supported:
- Standalone Conductor
- Conductor High Availability
All High Availability configurations must be run and managed over private connections.
Conductor High Availability for Cloud Deployments is not supported under Common Criteria.
Standalone Conductor
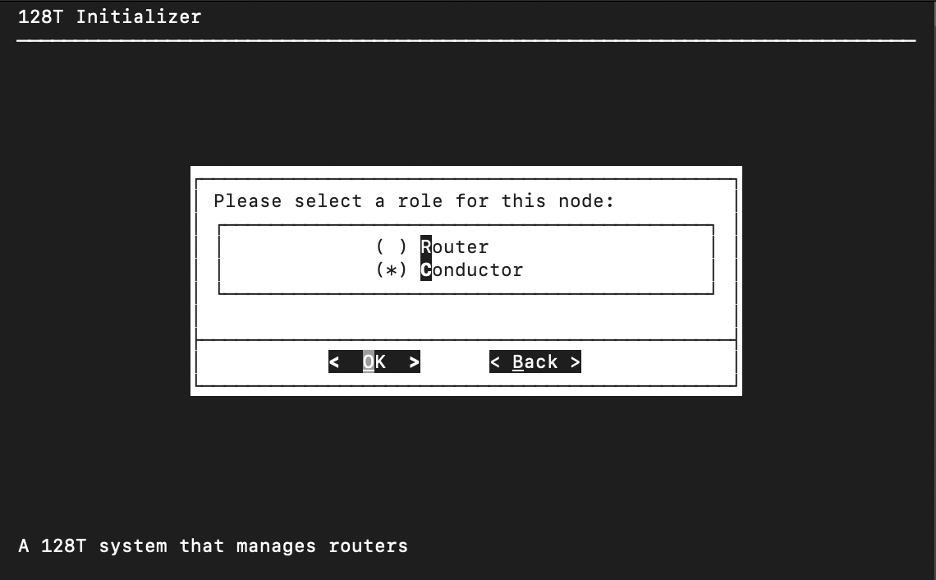
- On the SSR Initializer wizard screen, use the down arrow on the keyboard, or press "C" to select the Conductor role for the SSR node, and press the Enter key to select OK.
- When asked What kind of Conductor node is this?, select Standalone from the following options:
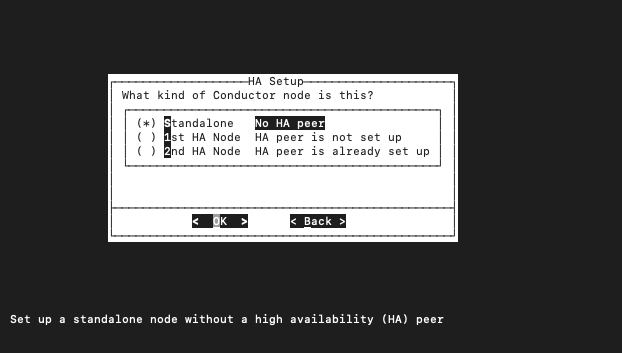
- Standalone: This conductor has no highly available peer, and is not currently planned for high availability.
-
Enter the following system properties on the Node Info screen:
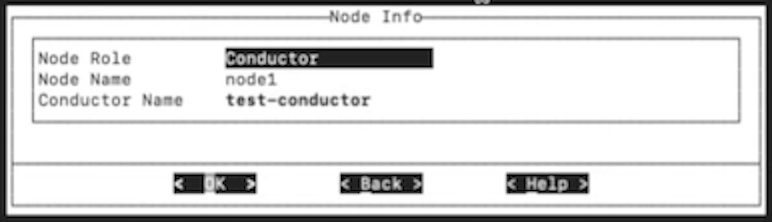
- Node Name: The name of the system within your Conductor, in this example, test-conductor. By default this field uses the Linux system's hostname. The node name identifies the conductor node under the Conductor element in the Authority.
noteBoth routers and conductors can consist of one node (for standalone systems) or two nodes (for highly available systems).
- Conductor Name: SSR devices follow a naming scheme akin to domain names (e.g.,
specific.general). As it relates to SSR devices, the leading name identifies the node and the trailing name identifies the name of the HA conductor or router pair. When referring to a running SSR software instance, it is identifiable by the full name; e.g.,test-conductor.conductor. The full system name is reflected in the CLI prompt.
-
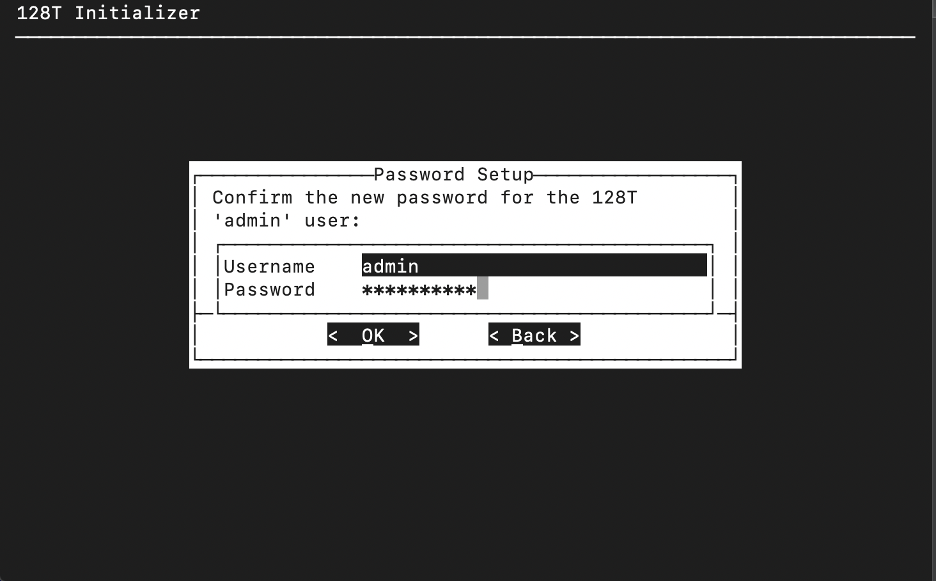
On the Password Setup screen, create a password for the SSR Admin user. The administrator password must be:
- At least 9 characters long
- Contain at least one uppercase letter
- At least one lowercase letter
- At least one number
- At least one special character (` ! @ # $ % ^ & * ( ) _ + ? ~ " -)
- Cannot contain the username in any form
- Cannot repeat characters more than 3 times This operation is only performed on the standalone or first node in the HA peer, and the password must be entered twice. For supporting password information, see Username and Password Policies.
Resetting a password requires entering the old password. If a password is lost or forgotten and the account is inaccessible, the account cannot be recovered. Please keep password records accessible and secure.
-
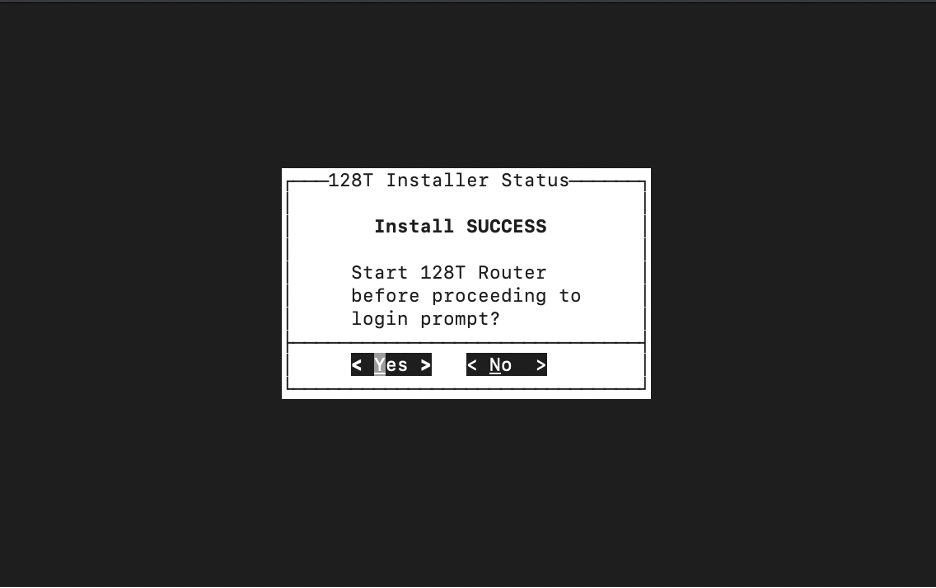
Press the Enter key to select OK. The Initializer performs a hardware compatibility check.
-
When prompted, select
<Yes>to start the conductor.
Root Access
To permit root access to the SSR system, ensure that there is at least one user configured on each system with super user (sudo) privileges. Failure to do so may result in the loss of management connectivity to the router. SSH Root login is not permitted.
Prerequisites for installation and upgrades now include configuring a super user in /etc/sudoers that is allowed to execute Linux shell commands as root (sudo privileges). During an upgrade, if the existing version allows SSH Root login, it will be disabled. When a system is installed using the OTP ISO, a "t128" user is automatically configured with sudo privileges.
- Login using the admin credentials.
- Enter the Linux shell: Type
shellto suspend the CLI and enter the Linux shell. - Type
suand enter the default root password. - Use the following command to grant sudo privilege to the
adminuser account:/usr/sbin/visudo - Add an entry for admin as follows:
admin ALL=(ALL) ALL
- Save the file and exit from
visudo. - Type
exitto leave thesuprompt.
Change the Default Passwords
The following user accounts and passwords are created during the ISO installation process:
| Username | Password |
|---|---|
| root | 128tRoutes |
| t128 | 128tRoutes |
Change these passwords immediately. Use the passwd command from the Linux shell to individually set the password for each username.
[admin@localhost ~]$ sudo passwd t128
Changing password for user t128
New password:
Retype new password:
passwd: all authentication tokens updated successfully.
[admin@localhost ~]$ sudo passwd root
Changing password for user root.
New password:
Retype new password:
passwd: all authentication tokens updated successfully.
[admin@localhost ~]$
The root account will not be used for day-to-day access, but the root account password should be stored securely off-box so that it can be used for admin account recovery if required.
Software Compliance Validation
After installing the SSR Software, it is important to verify that the installation successfully completed and that the system is running in the FIPS enforcememt mode required for Common Criteria compliance. After starting the SSR router or conductor, the login screen appears on the console. Alternatively you may ssh to the SSR management IP address using the admin account.
- Login using the admin credentials.
- Use
show system versionto verify the correct software release is running:
Last login: Thu Dec 14 13:28:36 UTC 2023 on pts/0
admin@conductor.conductor# show system version
Fri 2024-03-01 16:23:37 UTC
✔ Retrieving system version 1/1 targets complete...

=========== =========== ========= ======== ====================== =====================
 Router      Node        Version   Status   Build Date             Package
=========== =========== ========= ======== ====================== =====================
 128t-east   128t-east   6.2.5     r2       2024-06-06T23:56:25Z   128T-6.2.5-5r2.el
                                                                   7 (package based)

Completed in 0.05 seconds
admin@conductor.conductor#
It should report Version 6.2.5 and Status r2.
- Type
shellto suspend the CLI and enter the Linux shell. - Execute the command
sudo systemctl status 128Tand verify the service is listed asactive (running).
[root@conductor-test admin]# sudo systemctl status 128T -l
 128T.service - 128T service
  Loaded: loaded (usr/lib/systemd/system/128T.service; enabled; vendor preset: disabled)
  Active: active (running) since Mon 2023-7-31 18:04:29 UTC; 50min ago
 Main PID: 23317 (processManager)
- Perform the following steps to verify the software integrity and protect against future tampering:
- Execute the self-test scan
sudo systemctl start 128T-rpm-verify
The self-test scan is initiated and takes approximately two minutes to complete. Upon completion, run:
systemctl status 128T-rpm-verify
The scan validates all executable files on the system against the sha256 digest hash recorded in the signed RPMs from which they were installed. This ensures that no files have been replaced or tampered with.
- Run
systemctl status 128T-rpm-verifyto confirm that the service shows:
PASS: All RPM file digests verified
- If the result displays the following:
FAIL: RPM file digest mismatch detected
The failure must be resolved before continuing to ensure compliance. The full path to each file having a self-check digest mismatch is reported as part of the status output.
- After the self-test scan test has succeed, enable the automatic self-test by executing the
enablecommand in the linux shell:
sudo systemctl enable 128T-rpm-verify
The self-test is enabled on every subsequent reboot. If the self-test fails, the 128T service will not start.
-
Perform the following steps to verify that FIPS security enforcement mode is enabled in the OS:
openssl md5 /dev/nullExpected result:digital envelope routines … Disabled for fips -
Run the following command to verify that FIPS security enforcing mode is enabled in the kernel:
cat /proc/sys/crypto/fips_enabledExpected result:1 -
Type
exitto leave the Linux shell and return to the CLI. -
Type
quitto log out from CLI.
You have now completed security validation of the installation.
Configure the Token
After the system has been set up for the first time, the next step is to provision credentials for SSR software access on the conductor. Provisioning the software credentials on the conductor propagates those settings down to all of the managed routers.
From the root user in the workflow above, run the pcli command to access the CLI and configure the token.
Use the CLI command set software access-token. For information on this command, see set software access-token.
[root@test-conductor ~]# pcli
Starting the PCLI...
admin@node1.test-conductor# set software access-token <username> <password>
Saving...
Waiting for process to complete
...(messages removed for brevity)...
Making the DNF cache
No further operation requested. Exiting
Installer complete
Successfully saved credentials.
admin@node1.test-conductor#
CLI Access Post Install
Use the following procedure to access the CLI at any time after installation.
- Open a terminal window and SSH to the SSR's IP address.
- Use your login credentials to log in to the SSR
-
If using an account other than admin, type
pclito start the SSR CLI. -
Type
shellto suspend the CLI and enter the Linux shell.
To terminate an active session:
-
Type
exitto return from the Linux shell to the CLI. -
Type
quitto log out from CLI. -
If using an account other than admin, type
exitto end the login session.
Common Criteria certification does not require any restrictions on executing commands. See the Configuration Command Reference Guide for command information and usage.
Next Steps - Router Configuration
Congratulations, you have successfully installed and configured a conductor! The next step is to optimize the router onboarding process.
Creating router configurations on the conductor allows individual routers to download the necessary configuration to get up and running smoothly.
A sample branch router configuration is available as a template on the conductor. This is a great place to start the configuration process. Additionally, you can create configuration templates that allow administrators to automate the configuration of top-level resources. For more information, see Configuration Templates.
To see an example router configuration, refer to the Appendix.
After completing the router configuration on the conductor, please return to this guide to continue the Common Criteria compliant router installation.
If you will be using the OTP Quickstart router installation process, proceed to the OTP Router Install Process next, and then use the QuickStart From the OTP ISO steps to generate a basic configuration and quickstart file for router installation.
When configuring and installing a router in an environment operating under the Common Criteria guidelines, it is acceptable to provision this file using the GUI. Other uses of the SSR GUI are not supported under the Common Criteria guidelines.
If you choose to install routers using the Interactive Installation, continue with Router Interactive Installation.