Access Management
Following industry security best practices, SSH features have been limited and in the case of SSH Root Login, have been disabled.
Root Access
To permit root access to the SSR system, ensure that there is at least one user configured on each system with super user (sudo) privileges. Failure to do so may result in the loss of management connectivity to the router. Logging in as root over SSH is not permitted.
Prerequisites for installation and upgrades now include configuring a super user in /etc/sudoers that is allowed to execute Linux shell commands as root (sudo privileges).
During an upgrade, if the existing version allows SSH Root login, it will be disabled. When a system is installed using the OTP ISO, a "t128" user is automatically configured with sudo privileges.
- Login using the admin credentials.
- Enter the Linux shell: Type
shellto suspend the CLI and enter the Linux shell. - Type
suand enter the default root password. - Use the following command to grant sudo privilege to the
adminuser account:/usr/sbin/visudo - Add an entry for admin as follows:
admin ALL=(ALL) ALL
- Save the file and exit from
visudo. - Type
exitto leave thesuprompt.
Change the Default Passwords
The following user accounts and passwords are created during the ISO installation process:
| Username | Password |
|---|---|
| root | 128tRoutes |
| t128 | 128tRoutes |
Change these passwords immediately. Use the passwd command from the Linux shell to individually set the password for each username.
[admin@localhost ~]$ sudo passwd t128
Changing password for user t128
New password:
Retype new password:
passwd: all authentication tokens updated successfully.
[admin@localhost ~]$ sudo passwd root
Changing password for user root.
New password:
Retype new password:
passwd: all authentication tokens updated successfully.
[admin@localhost ~]$
The root account will not be used for day-to-day access, but the root account password should be stored securely off-box so that it can be used for admin account recovery if required.
SSH Key-based Authentication
To configure authentication by public key, use the scp command from a Linux/Unix based machine or another SCP client to write the file /home/<username>/.ssh/authorized_keys to the SSR.
The contents of this file are the public key of the public/private key pair. To use multiple keys, specify the public key of each of the multiple keys on separate lines of the authorized_keys file.
To remove access for a specific key, replace authorized_keys with a file that no longer contains the public part of that key. This can also be accomplished by writing an empty file to remove all keys.
Example:
If the t128 user wants to use public key authentication, the /home/t128/.ssh directory must be created first and have permissions set using the following commands:
mkdir /home/t128/.ssh
chmod u=rwx,g=,o= /home/t128/.ssh
Then use the directions for uploading an authorized_keys file via scp, or manually edit /home/t128/.ssh/authorized_keys directly.
SSH Server Cryptographic Algorithms
The following SSH parameter lists are hard-coded as the system defaults:
KexAlgorithms diffie-hellman-group16-sha512,diffie-hellman-group18-sha512,diffie-hellman-group14-sha256
HostKeyAlgorithms rsa-sha2-512,rsa-sha2-256,ssh-rsa
Ciphers aes256-ctr,aes128-ctr
MACs hmac-sha2-512,hmac-sha2-256
These default SSH parameters are defined by the template file /usr/lib/128technology/sshd/config.template.fips:
If these lists are changed, the 128T service must be restarted with systemctl restart 128T.
The template file will be overwritten when newer versions of 128T software are installed. Changes to this file must be persisted elsewhere and compared to versions from new software.
Additional SSH Information
- Idle SSH sessions are logged out after 60 minutes of inactivity.
- SSH Mode Verification performs strict mode checking of home directory configuration files, as well as user-specific SSH configuration files to prevent one user from logging on to the system as another user.
- SSH logon by a non-certificate-trusted host is not allowed.
- The SSH login grace time is limited to waiting for one minute for a password to be entered.
- SSH access is limited to users assigned to the
wheelgroup. - When creating a user with SSH privileges from the UI, that user must be assigned to an admin user group.
Limiting Login Attempts
If a user attempts to login unsuccessfully six times within a 15 minute window, they will be locked out for 30 minutes. The failed attempts are cumulative from both SSH and the web interface. The user will need to wait, or their account can be reset by an admin from the Linux shell.
Syntax to unlock:
faillock --user <user> --reset
Common Criteria requires that there is always one local account which can log in. As a “break-glass” the local root account can be used to issue the above ‘faillock’ command, to re-enable the admin account if that has become disabled. The root account is not accessible remotely, this must be performed from the system console.
User account status is managed independently per node of the HA pair.
File Upload Limitations
The config import functionality has the following constraints:
- A max file size of 25 MB – an error is displayed if the file size is too large.
- One upload per user every 15 seconds.
- Verification of the
*.gzfile format.
Software Compliance Validation
After installing the SSR Software, it is important to verify that the installation completed successfully and that the system is running in FIPS enforcement mode as required for Common Criteria compliance. After starting the SSR router or conductor, the login screen appears on the console. Alternatively you may ssh to the SSR management IP address using the admin account.
- Login using the admin credentials.
- Use
show system versionto verify the correct software release is running:
Last login: Thu Dec 14 13:28:36 UTC 2023 on pts/0
admin@conductor.conductor# show system version
Fri 2024-03-01 16:23:37 UTC
✔ Retrieving system version 1/1 targets complete...

=========== =========== ========= ======== ====================== =====================
 Router      Node        Version   Status   Build Date             Package
=========== =========== ========= ======== ====================== =====================
 128t-east   128t-east   6.2.5     r2       2024-06-06T23:56:25Z   128T-6.2.5-5r2.el
                                                                   7 (package based)

Completed in 0.05 seconds
admin@conductor.conductor#
It should report Version 6.2.5 and Status r2.
- Type
shellto suspend the CLI and enter the Linux shell. - Execute the command
sudo systemctl status 128Tand verify the service is listed asactive (running).
[root@conductor-test admin]# sudo systemctl status 128T -l
 128T.service - 128T service
  Loaded: loaded (usr/lib/systemd/system/128T.service; enabled; vendor preset: disabled)
  Active: active (running) since Mon 2023-7-31 18:04:29 UTC; 50min ago
 Main PID: 23317 (processManager)
- Perform the following steps to verify the software integrity and protect against future tampering:
- Execute the self-test scan
sudo systemctl start 128T-rpm-verify
The self-test scan is initiated and takes approximately two minutes to complete. Upon completion, run:
systemctl status 128T-rpm-verify
The scan validates all executable files on the system against the sha256 digest hash recorded in the signed RPMs from which they were installed. This ensures that no files have been replaced or tampered with.
- Run
systemctl status 128T-rpm-verifyto confirm that the service shows:
PASS: All RPM file digests verified
- If the result displays the following:
FAIL: RPM file digest mismatch detected
The failure must be resolved before continuing to ensure compliance. The full path to each file having a self-check digest mismatch is reported as part of the status output.
- After the self-test scan test has succeed, enable the automatic self-test by executing the
enablecommand in the linux shell:
sudo systemctl enable 128T-rpm-verify
The self-test is enabled on every subsequent reboot. If the self-test fails, the 128T service will not start.
-
Perform the following steps to verify that FIPS security enforcement mode is enabled in the OS:
openssl md5 /dev/nullExpected result:digital envelope routines … Disabled for fips -
Run the following command to verify that FIPS security enforcing mode is enabled in the kernel:
cat /proc/sys/crypto/fips_enabledExpected result:1 -
Type
exitto leave the Linux shell and return to the CLI. -
Type
quitto log out from CLI.
You have now completed security validation of the installation.
CLI Access Post Install
Use the following procedure to access the CLI at any time after installation.
- Open a terminal window and SSH to the SSR's IP address.
- Use your login credentials to log in to the SSR
-
If using an account other than admin, type
pclito start the SSR CLI. -
Type
shellto suspend the CLI and enter the Linux shell.
To terminate an active session:
-
Type
exitto return from the Linux shell to the CLI. -
Type
quitto log out from CLI. -
If using an account other than admin, type
exitto end the login session.
Common Criteria certification does not require any restrictions on executing commands. See the Configuration Command Reference Guide for command information and usage.
Additional Software Self-Tests
In addition to the 128T-rpm-verify RPM binary validation self-test described in the previous section, the SSR software also runs FIPS power-on self-tests at every boot. These are split into three main functional areas:
- HMAC signature validation of the cryptography related software
- Kernel known-answer tests for the FIPS subsystem
- SSL known-answer tests for the FIPS algorithms
If any self-test fails, the corresponding cryptographic operations performed by that component are denied and the system journal records an error in the log.
HMAC Signature Validation
Upon installation from the ISO, an HMAC signature is calculated for the Linux kernel and written to the boot partition on disk. With each subsequent boot the software runs an HMAC check of the kernel and compares the result to the stored value.
If the calculated HMAC matches the stored value, the bootloader continues loading the kernel.
The validation status is displayed very briefly on console during boot - it scrolls by quickly unless there is an error.
![]()
It is recorded in the systemd journal for historical data:

If the calculated HMAC does not match the stored value, the bootloader denies loading the kernel and halts the system. In this case, the error log FATAL: FIPS integrity test failed is displayed on the system consoleas shown below.

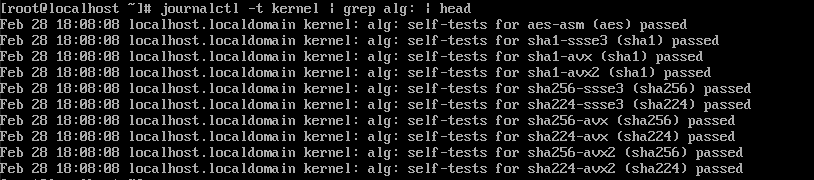
Kernel Known Answer Tests
The Kernel Known Answer Tests (KAT) for the FIPS subsystem run automatically at startup. Any failures are displayed on the system console during boot. These scroll quickly off screen, but are recorded in the systemd journal for historical data:
OpenSSL Known Answer Tests
The SSL library used on the SSR is FIPS certified as part of the Oracle Linux 7 operating system. Oracle FIPS documentation is available at https://www.oracle.com/a/ocom/docs/corporate/140sp4170.pdf. Chapter 9 describes the self-test behaviors.
In summary:
- Self-tests for each cryptographic algorithm are run whenever the OpenSSL library is loaded into memory on a FIPS-enabled system. The cryptographic module HMAC is also validated using a similar scheme as described above.
- On successful completion of all tests, the OpenSSL module comes into service for the linked application. If any of the tests fail, the module transitions to an error state and the application fails with an error log.
- OpenSSL a set of periodic runtime re-validation tests, which may be triggered during rekeying or other activities.
- No external logs are exposed from OpenSSL during this activity, but the failure to start OpenSSL applications such as OpenSSH are logged by the respective application.
Recovery Action for All Self-test Failures
Regardless which functional area triggers a self-test failure, the recovery process is the same:
- Power off the SSR hardware
- Wait 30 seconds
- Power on the SSR hardware
If the system still fails to boot normally after power cycling, the software must be considered compromised.
Recovery for compromised software requires reinstalling the SSR software from the distribution ISO. This process erases the current disk content and applies a fresh installation.