Installing a BYOL Mist-managed Router in GCP
This guide describes the process for deploying a Mist-managed Session Smart Router (SSR) in GCP using your own license. The process consists of the following steps:
- Selecting the GCP Plan
- Deploying a Session Smart Router.
Selecting the GCP Plan
Bring Your Own License (BYOL): BYOL allows you to install your own licensed copy of the SSR software on a GCP VM. The device registration code is used to authenticate access to the Mist installation repositories.
For the latest information about SSR BYOL offerings, refer to the Cloud Images BYOL Release Notes.
Selecting the Instance Size
The following instance types are supported for virtual SSR in GCP. Choose the size that best meets your requirements. More information on GCP instance types can be found in the GCP Documentation.
| Recommended VM Size | Max vNICs Supported | vCPU Cores | Memory |
|---|---|---|---|
| c2-standard-4 | 4 | 4 | 16 GB |
| c2-standard-8 | 8 | 8 | 32 GB |
| c2-standard-16 | 10 | 16 | 64 GB |
| c2-standard-30 | 10 | 30 | 120 GB |
Session Smart Router Size recommendatations can be found in System Requirements.
Session Smart Router
Use the following process to deploy a Mist-managed Session Smart Router in GCP.
Requirements
The following infrastructure must exist in your GCP project:
- A VPC for each network interface attached to the Session Smart Router with an associated subnetwork.
- Public: This VPC provides connectivity to enable communication with external/remote SSR peers as well as access to the Mist cloud infrastructure if no management interface is provided.
- Private: This VPC provides connectivity to internal workloads within the cloud.
- [Optional] Management: This VPC provides connectivity to the Mist cloud and is reachable for SSH administration purposes.
- [Optional] HA Sync: This VPC provides connectivity to the HA peer for sync purposes. Required for HA routers.
- [Optional] HA Fabric: This VPC provides fabric connectivity to the HA peer. Required for HA routers.
Deployment
A Session Smart Router can be deployed manually via Google Cloud Marketplace or in an automated fashion using Terraform commands. Choose the method that best suits your needs.
When deploying the Session Smart Router, the following infrastructure is created automatically:
- Virtual machine with the Session Smart image specified.
- A network interface per VPC and subnet provided.
- Firewall rules for each network interface.
- Unique and static public IP addresses attached to each public and management interface.
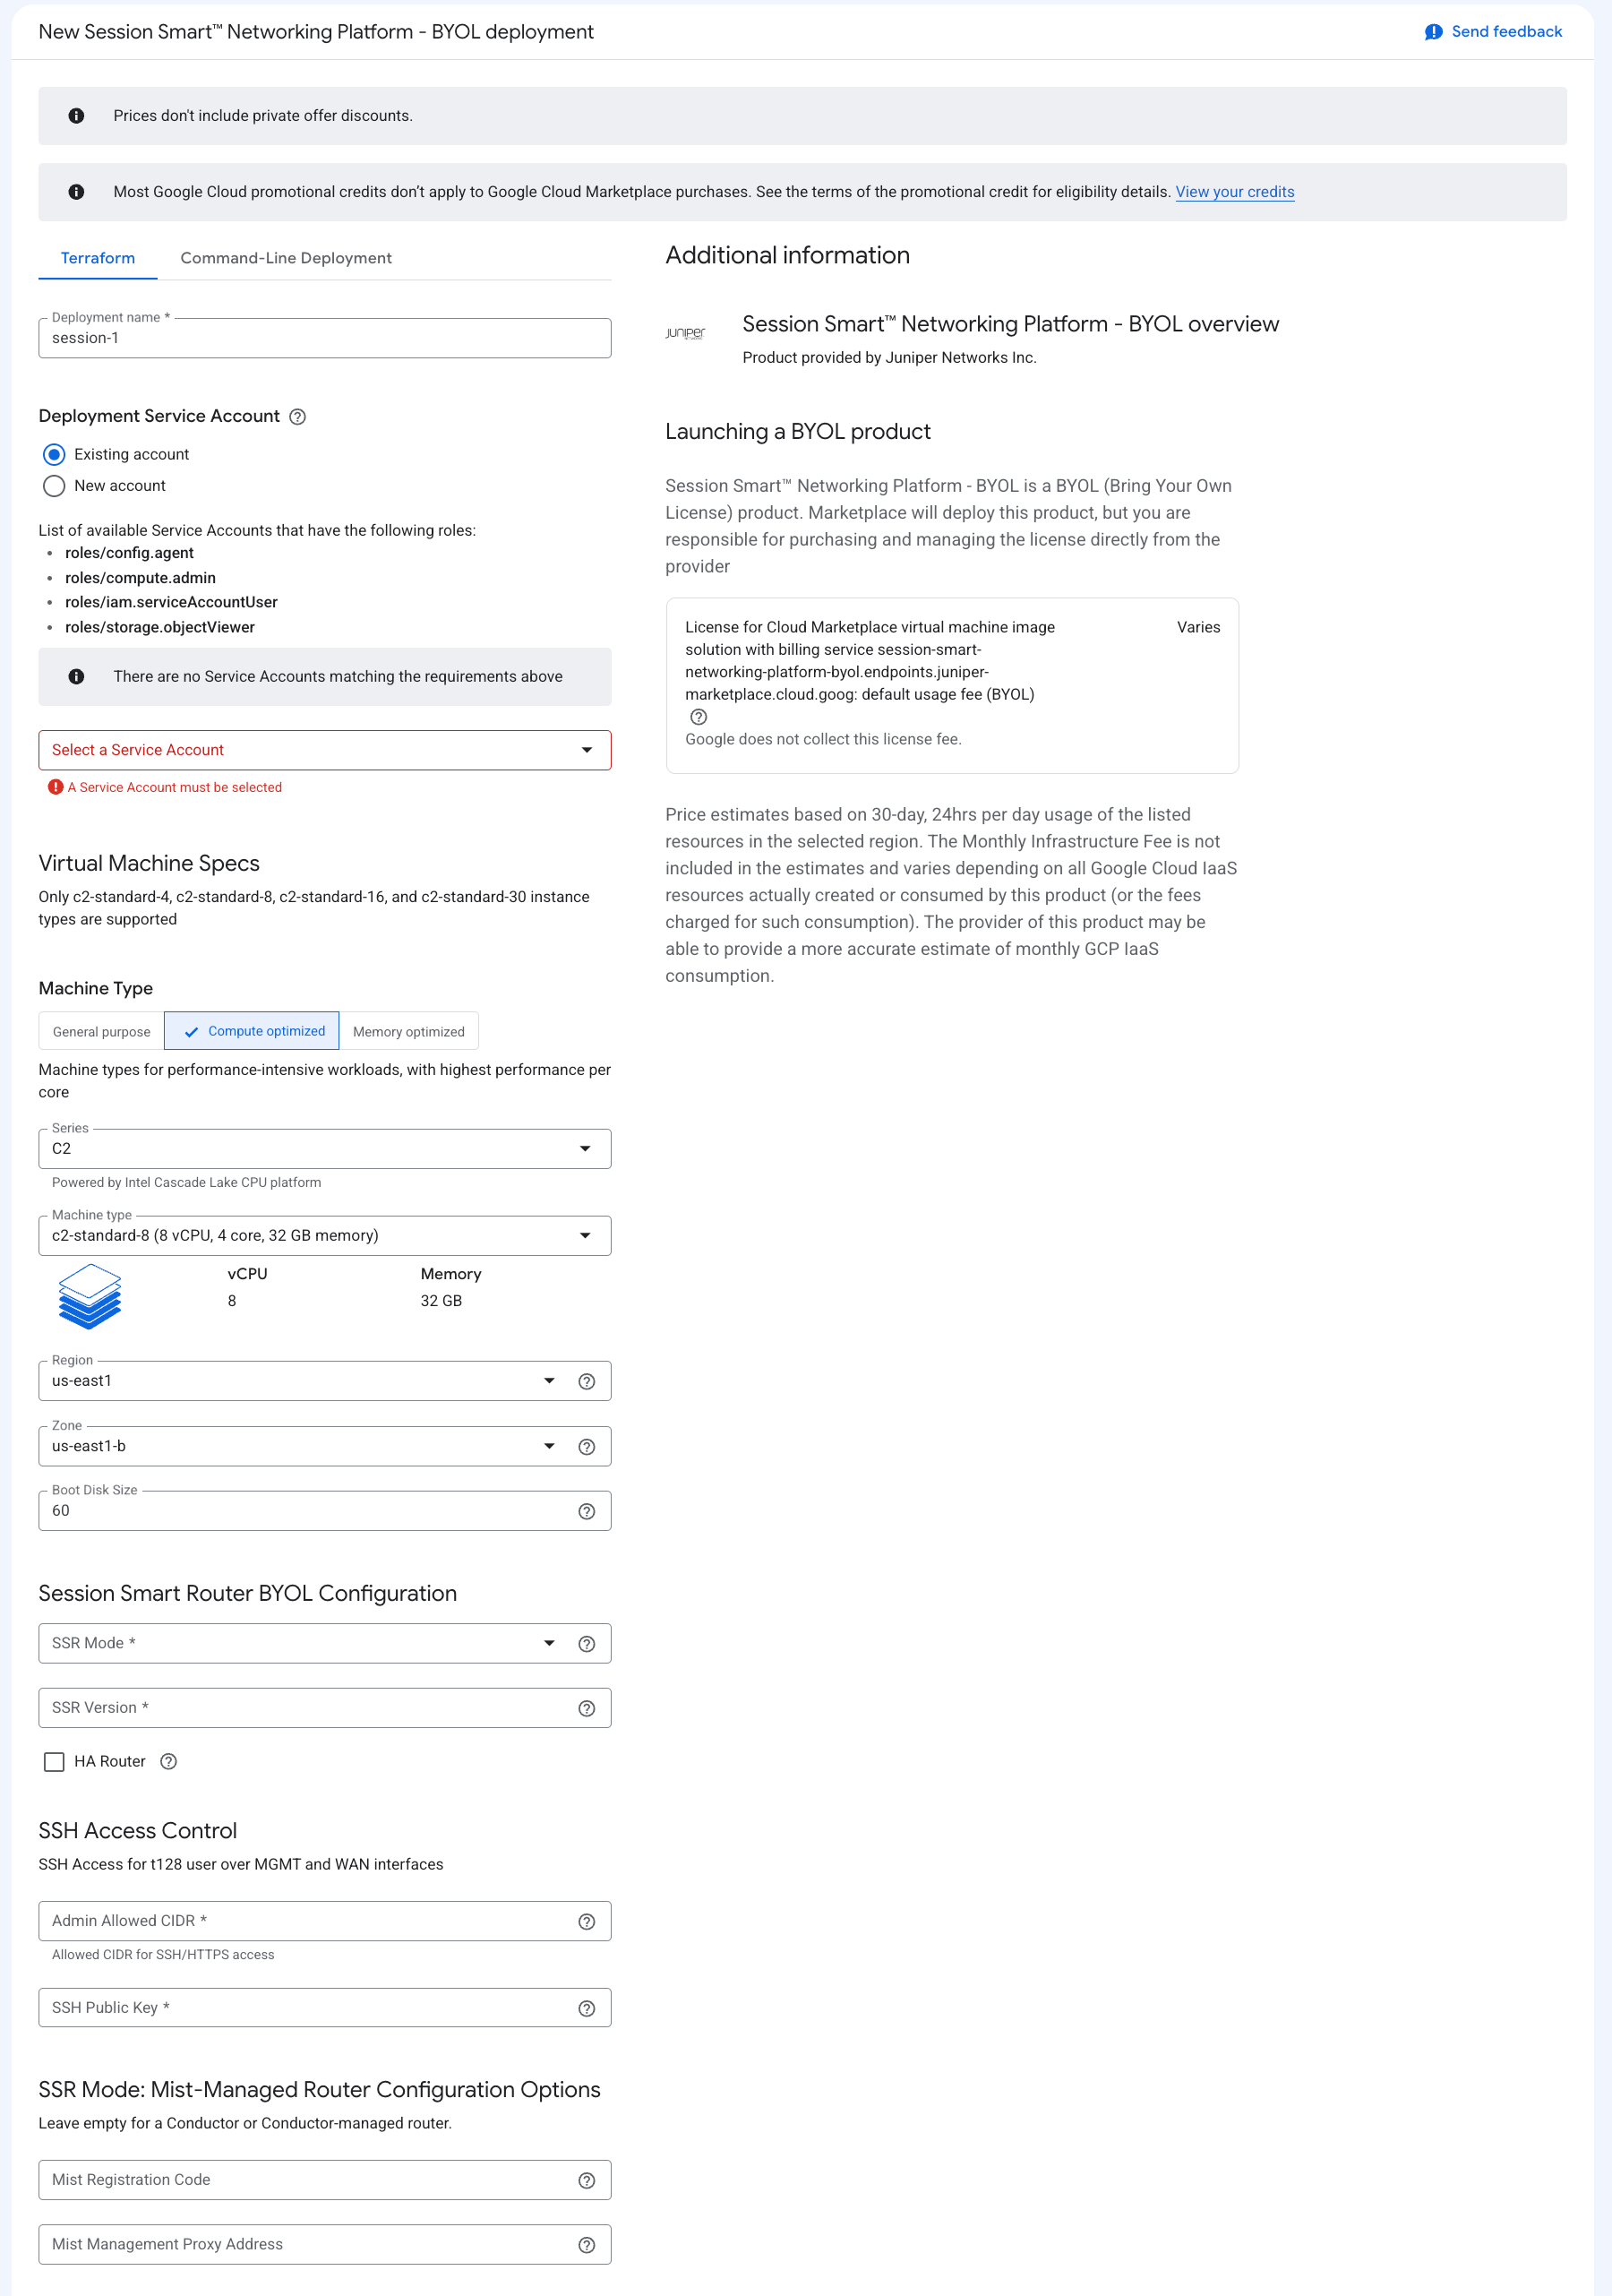
GCP Marketplace
To deploy the Session Smart Networking software via the GCP Marketplace:
- Navigate to the Session Smart Networking Platform BYOL offering in Google Cloud Marketplace.
- Click Launch.
- Provide deployment inputs for your project, region, zone, and machine type.
- In SSR mode, select Mist-managed.
- Provide the BYOL software inputs:
- SSR software version
- Specify whether the router is High Availability (HA).
- Provide administrative access settings:
- Allowed CIDR(s) for SSH/HTTPS access
- SSH public key
- Provide the Mist registration code.
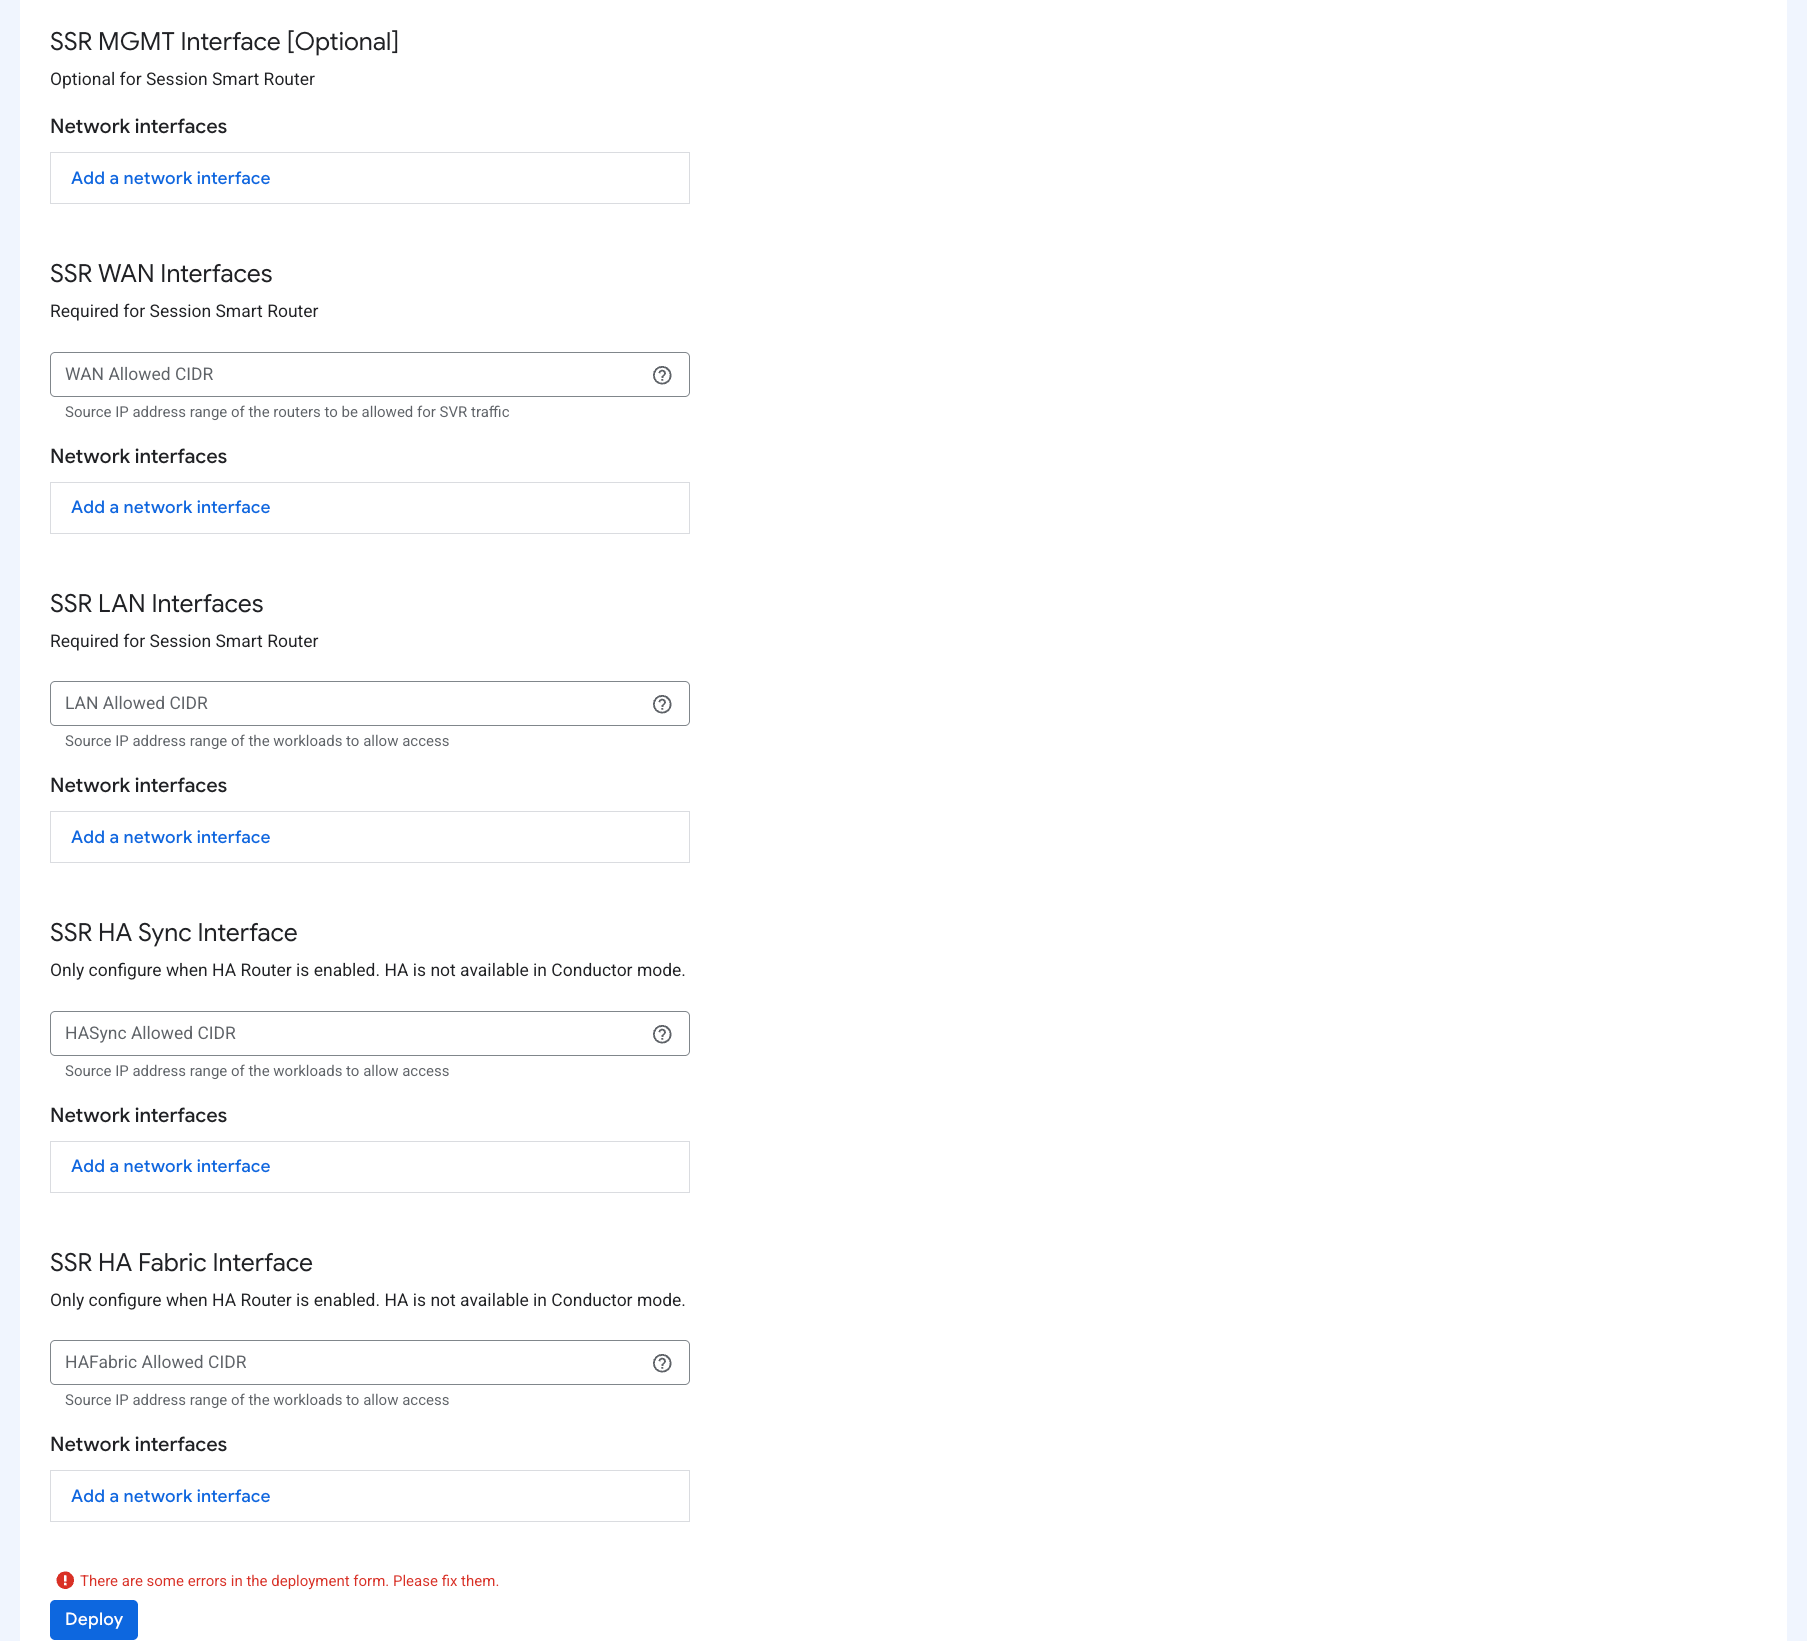
- Provide network interface settings.
- Minimum one WAN and one LAN interface are required.
- Configure allowed CIDR values for WAN and LAN access.
- Optionally configure an out-of-band management interface.
- Configure HA Sync and HA Fabric interfaces when HA is enabled in step 6.
- Review and deploy.
Leave the Conductor and Conductor-managed configuration sections empty.
A complete description of all parameters can be found in Deployment Parameters.
Once the deployment completes, access information is provided in the Outputs section of the Details tab.
The non-interactive, Zero Touch Provisioning (ZTP) method is triggered. After the VM is deployed, it will take 2 to 3 minutes for the asset to appear in the Mist inventory and be associated with the router configuration. It will then take an additional 5 to 10 minutes for the desired SSR version to be installed, after which the SSR version is populated in Mist inventory.
Terraform Deployment
A Mist-managed Session Smart Router can be deployed from the command line directly using Terraform. Follow the Terraform documentation to install and setup the Terraform package.
Download the Session Smart Router Terraform package:
- Navigate to the Session Smart Networking Platform BYOL offering in Google Cloud Marketplace.
- Click Launch.
- Select the Command-Line Deployment tab.
- Click Download to download the Terraform deployment package.
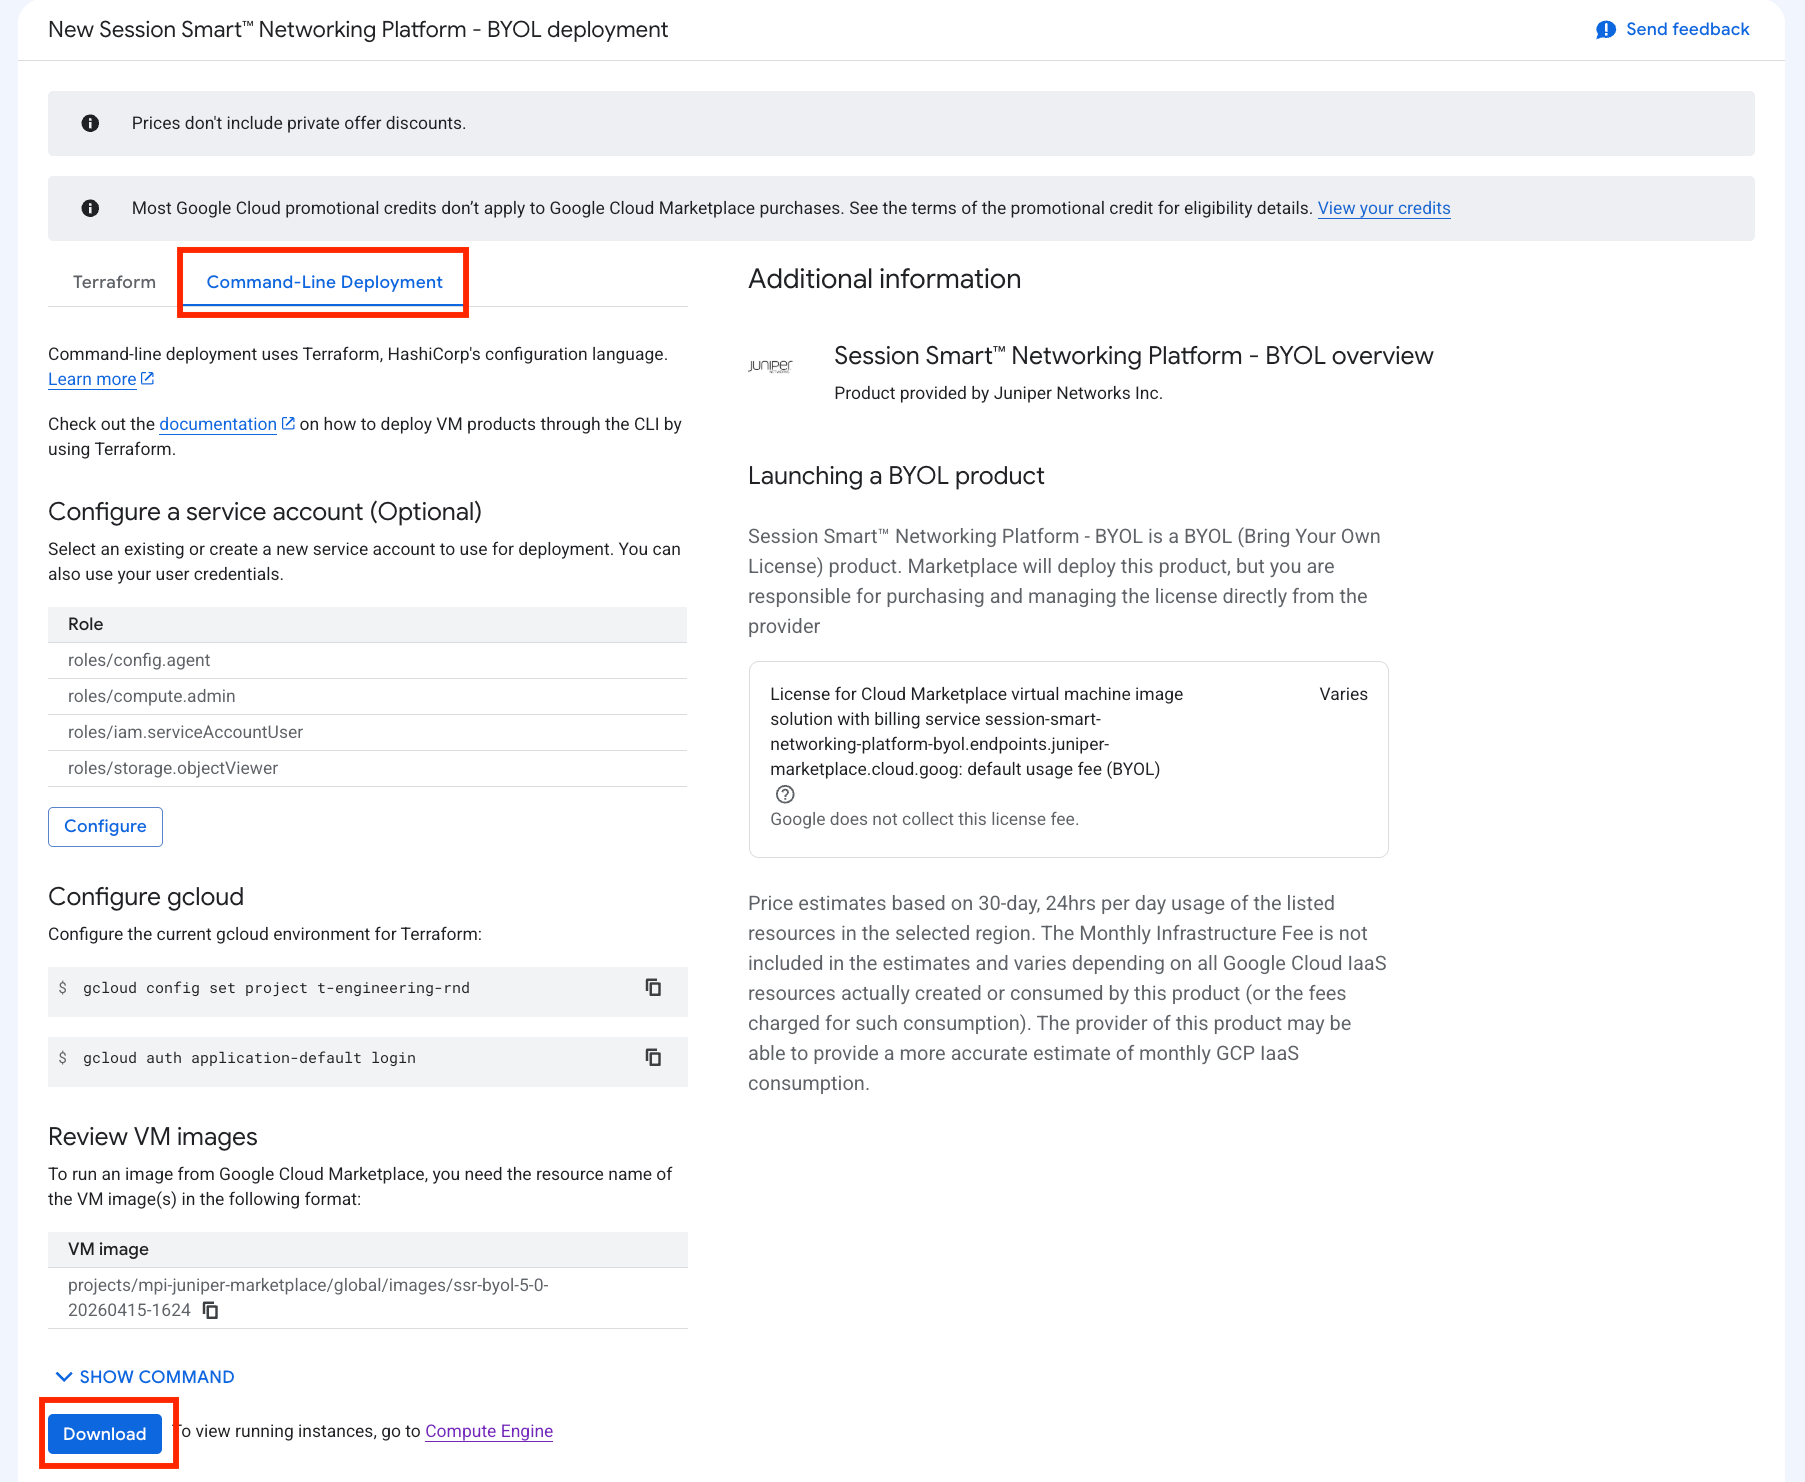
Within the downloaded package, create a Terraform variables file named ssr-variables.tf.
Provide the following required variables for a Mist-managed router. See Deployment Parameters for all possible variables.
ssr_mode = "mist-managed"
ssr_version = "7.0.1"

reg_code = "reg-code"
ssh_public_key = "ssh key"
admin_allowed_cidr = "cidr"

wan_nic_allowed_cidr = "0.0.0.0/0"
wan_nic_networks = [
  "ssr-public"
]
wan_nic_subnets = [
  "public"
]

lan_nic_allowed_cidr = "0.0.0.0/0"
lan_nic_networks = [
  "ssr-private"
]
lan_nic_subnets = [
  "private"
]
Apply Terraform using the following commands:
terraform init
terraform apply --var-file=ssr-variables.tf
Deployment Parameters
The following are all possible parameters for a Mist-managed Router deployment.
| GCP Marketplace Name | Terraform Variable | Description |
|---|---|---|
| Machine Type | machine_type | GCP machine type for the VM (for example, c2-standard-8). |
| Region | region | GCP region where the router will be deployed. |
| Zone | zone | GCP zone within the selected region for VM placement. |
| Boot Disk Size | boot_disk_size | Boot disk size in GB. Minimum 60 GB is recommended. |
| SSR Mode | ssr_mode | Router onboarding mode. For this workflow, use mist-managed. |
| SSR Version | ssr_version | SSR software version to install during onboarding. |
| HA Router | ha_router | Enables HA interface fields and deploys the router as an HA-capable instance. |
| Admin Allowed CIDR | admin_allowed_cidr | Source CIDR allowed for SSH and HTTPS administrative access. |
| SSH Public Key | ssh_public_key | Public SSH key injected into the VM for administrator login. |
| Mist Registration Code | reg_code | Mist registration code used to claim and onboard the router to the Mist organization. |
| [Optional] Mist Management Proxy Address | mgmt_proxy | Proxy address used by the router to reach Mist services when direct egress is not available. |
| [Optional] SSR MGMT Interface Network | mgmt_nic_network | VPC network name for the optional out-of-band management interface. |
| [Optional] SSR MGMT Interface Subnet | mgmt_nic_subnet | Subnet name for the optional out-of-band management interface. |
| WAN Allowed CIDR | wan_nic_allowed_cidr | Source CIDR allowed to reach WAN-facing interfaces. |
| SSR WAN Interfaces Networks | wan_nic_networks | List of VPC network names for WAN interfaces (minimum one). |
| SSR WAN Interfaces Subnet | wan_nic_subnets | List of subnet names for WAN interfaces. Must align by index with wan_nic_networks. |
| LAN Allowed CIDR | lan_nic_allowed_cidr | Source CIDR for traffic allowed from internal workloads toward LAN interfaces. |
| SSR LAN Interfaces Networks | lan_nic_networks | List of VPC network names for LAN interfaces (minimum one). |
| SSR LAN Interfaces Subnet | lan_nic_subnets | List of subnet names for LAN interfaces. Must align by index with lan_nic_networks. |
| [Optional] HA Sync Allowed CIDR | hasync_nic_allowed_cidr | Source CIDR allowed for HA synchronization traffic between HA peers. |
| [Optional] SSR HA Sync Interface Network | hasync_nic_network | VPC network name for the HA Sync interface. Required when HA is enabled. |
| [Optional] SSR HA Sync Interface Subnet | hasync_nic_subnet | Subnet name for the HA Sync interface. Required when HA is enabled. |
| [Optional] HA Fabric Allowed CIDR | hafabric_nic_allowed_cidr | Source CIDR allowed for HA fabric traffic between HA peers. |
| [Optional] SSR HA Fabric Interface Network | hafabric_nic_network | VPC network name for the HA Fabric interface. Required when HA is enabled. |
| [Optional] SSR HA Fabric Interface Subnet | hafabric_nic_subnet | Subnet name for the HA Fabric interface. Required when HA is enabled. |
Network Interface Layout
The GCP Marketplace and Terraform templates attach router interfaces in a deterministic order. This order controls interface naming and should be preserved in your deployment inputs.
Attachment order:
- Management (optional)
- WAN interfaces (required, at least one)
- LAN interfaces (required, at least one)
- HA Sync (optional, required when HA is enabled)
- HA Fabric (optional, required when HA is enabled)
Interface names start at ge-0-0 and increment in the same order shown above.
Example: If an HA SSR is deployed with one Management interface, two WAN interfaces, and two LAN interfaces, the names map as follows:
| Network Interface Name | Role | Mist Config Name |
|---|---|---|
| ge-0-0 | Management | Out Of Band Management |
| ge-0-1 | WAN 1 | ge-0/0/1 |
| ge-0-2 | WAN 2 | ge-0/0/2 |
| ge-0-3 | LAN 1 | ge-0/0/3 |
| ge-0-4 | LAN 2 | ge-0/0/4 |
| ge-0-5 | HA Sync | ge-0/0/5 |
| ge-0-6 | HA Fabric | ge-0/0/6 |
When using Terraform, keep network and subnet arrays in the same intended order so interface naming stays consistent across environments.
Cloud-init Onboarding
When launching a GCP instance using automation, you can use cloud-init user-data to provide Mist onboarding information at first boot:
#cloud-config
write_files:
  - path: /etc/128T-hardware-bootstrapper/onboarding-config.json
    content: |
      {
        "name": "<router-name>",
        "ssr-version": "<version>",
        "mode": "mist-managed",
        "registration-code": "<mist-registration-code>",
        "cloud-provider": "gcp"
      }
| Option | Meaning |
|---|---|
| name | Name of the router instance. |
| ssr-version | SSR software version to install on first boot (BYOL only). |
| mode | Set to mist-managed for this workflow. |
| registration-code | Mist registration code used to claim and onboard the device. |
| cloud-provider | Set to gcp. |
| download-timeout | The timeout duration for installing BYOL (default: 6h) |
| download-retries | The number of times to retry SSR installation (default: unlimited) |
If your deployment requires a proxy to reach Mist cloud services, include the appropriate proxy value in your deployment parameters.
Manual Onboarding
If onboarding data is not provided at deployment time, manually onboard the router:
- Log in to the instance using the configured Linux user and SSH key.
- Run
sudo /usr/libexec/hardwareBootstrapper128t config-generator. - Select Mist-managed onboarding and provide the required values (registration code, version, and related prompts).
- Apply the generated configuration and allow initialization to complete.
- Verify onboarding from the router CLI using
show mistafter the system is up.
Troubleshooting
Failed deployment in GCP Marketplace
If the deployment failed in the GCP Marketplace, a required parameter is likely missing. To view the error:
- Select View Logs in the upper right corner
- In the Build Summary step, search for the phrase
Error: Resource precondition failed
This will provide you with the necessary actions to successfully deploy a Session Smart Router.
Device Does Not Exist in Mist After ZTP
Once the instance is launched with the correct registration code, the device self-onboards to the appropriate Mist organization. The device appears as unassigned in the Mist organization once onboarding is complete. At this point, the SSR installation process begins. This process can take up to 15 minutes to complete.
If the device does not show up in the Mist organization or the desired SSR version was not installed after 15 minutes, SSH into the instance.
-
Try to log into the pcli, run
su adminand thenshow mist. -
If the pcli is not accessible or the status and necessary action is not obvious, capture the Hardware Bootstrapper tech support (
/var/log/128T-hardware-bootstrapper/hardware-bootstrapper-tech-support.zip) and examine the journal for128T-hardware-bootstrapper,ember, and128T-mist-agent.