Installing a PAYG Conductor-managed Router in Azure
Introduction
This guide describes the process for deploying a PAYG (Pay As You Go) Session Smart Conductor and a Session Smart Router (SSR) in Azure.
Mist-managed SSR installations are now available through Azure. See Installing a Mist-Managed Router in Azure for details. However, SSR Version 6.x installed as an Azure image will only support Mist-managed routers. It will not support a conductor-managed deployment.
If you wish to install SSR Version 6.x on a conductor and conductor-managed router in Azure, the suggested procedure is to first install an earlier version of SSR software such as 5.x.x, and upgrade through the conductor.
The process consists of the following steps:
- Selecting the Azure Plan.
- Deploying a Session Smart Conductor.
- Deploying a Session Smart Router.
Selecting the Azure Plan
There are different Plans available for the Juniper Session Smart Networking Platform offering:
- Private Plan: For cases where there is no access to the SSR repositories (no internet connection) from the Azure environment where the software will be deployed, a Private image can be shared in the Azure Marketplace using your Azure subscription. To request access to a private plan, refer to Requesting access to a Private plan for additional information.
- Hourly Plan: This provides a free trial period for 30 days and an hourly software cost after the trial expires. This plan is recommended for Proof of Concepts and Trials only. Software upgrades and deployments outside of the cloud, (on premises) require a software access token. Select the Hourly plan of the Session Smart Networking Platform offering.
Once you have selected the plan that best suits the needs of your deployment, proceed to Session Smart Conductor Deployment to deploy a Session Smart Conductor, or Session Smart Router Deployment to deploy a Session Smart Router.
Requesting Access to a Private Plan
There is no software cost associated with deploying the Private image, the cost of running the VM is the only cost (i.e., Azure compute cost). Please also note that software upgrades and deployments outside of the cloud (e.g., on premises) are not possible without a software access token.
To request access to a Private plan:
- Locate the Subscription ID of the Azure account where the deployment of the software is going to take place. Follow the next steps to find the Subscription ID:
- Go to the Azure portal.
- On the search box right at the top of the screen, search for Subscriptions. If you cannot find the subscription associated with your Azure account go to Azure Subscriptions.
- Take note of your Subscription ID.
- Contact your Juniper Networks Sales representative and provide:
- The Subscription ID of the Azure account that will be used for the deployment.
- The version of the Session Smart Networking software. If necessary, your Juniper Sales representative will assist you to determine the best version for your deployment.
-
Wait for the confirmation from your Juniper Sales representative to confirm that your Azure Subscription has been allowlisted and therefore access has been granted.
-
Once your Subscription ID has been allowlisted, validate that the Private plan has been shared with your Subscription:
- Go to the Azure portal.
- On the search box right at the top of the screen, search for Marketplace. If you are unable to access the Marketplace via your Azure Portal, use this Azure Marketplace link..
- The following banner is displayed at the top:
![]()
- Click on the View private products link.
- If the Private image of the Session Smart Networking Platform offering is displayed, then the Private image has been shared successfully with your Azure Subscription ID.
Session Smart Conductor Deployment
Requirements
The following infrastructure must exist in your Azure subscription:
- A VNet where the Conductor will be deployed.
- The existing VNet is segmented with at least one subnet.
- The subnet is reachable for SSH and HTTPs access for administration purposes.
- The Session Smart Routers managed by this Conductor must be able to reach the IP address of the Conductor in this subnet.
Deployment
A Conductor can be deployed via the Azure Portal or in an automated fashion using Azure CLI or PowerShell commands. This section describes both methods. Choose the method that better suits your needs.
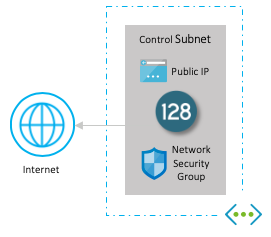
When deploying the Session Smart Conductor using the templates referenced in this section, the following infrastructure elements are created automatically to assist with the deployment process:
- Virtual machine using a Session Smart image available in the marketplace.
- The Conductor is deployed with a single network interface identified as the control interface.
- There is a network security group associated with the control interface.
- The control interface has a unique and static public IP address.
The following image shows the infrastructure elements deployed:
Azure Portal
To deploy the Session Smart Networking software via the Azure Portal:
Click on the Session Smart Networking Platform offering selected during the previous section Selecting the Azure plan. Click on the Get it now button. Agree to the terms of use and privacy policy of the image. Click on the tab Plans + Pricing as shown in the following picture:
![]()
Lastly click on the Launch link of the Juniper Session Smart Conductor template that better suits your needs.
Answer the following 3 questions to launch the deployment of a Conductor. For additional details, see Launch the Template.
- What name do you want to give it? Provide it in the Instance Name field (for example: Conductor).
- Where do you want to deploy it?
- Provide the location where the VNet exists in the Location field (for example: eastus). All available Azure locations. Note the name of the Location field is one word and all lowercase; for example,
eastus,westus,westeurope,eastasia. - Provide the name of the VNet in the Virtual Network Name field (for example: SSC-VNet).
- Provide the name of a subnet in the Control Subnet Name field (for example: default).
- Who is going to be the administrator? Provide an username (for example: t128) in the Admin Username field and the content of your public SSH key in the Admin Public Key Data field respectively.
Agree to the terms of use and conditions of the deployment, and click on the Purchase button to launch the deployment.

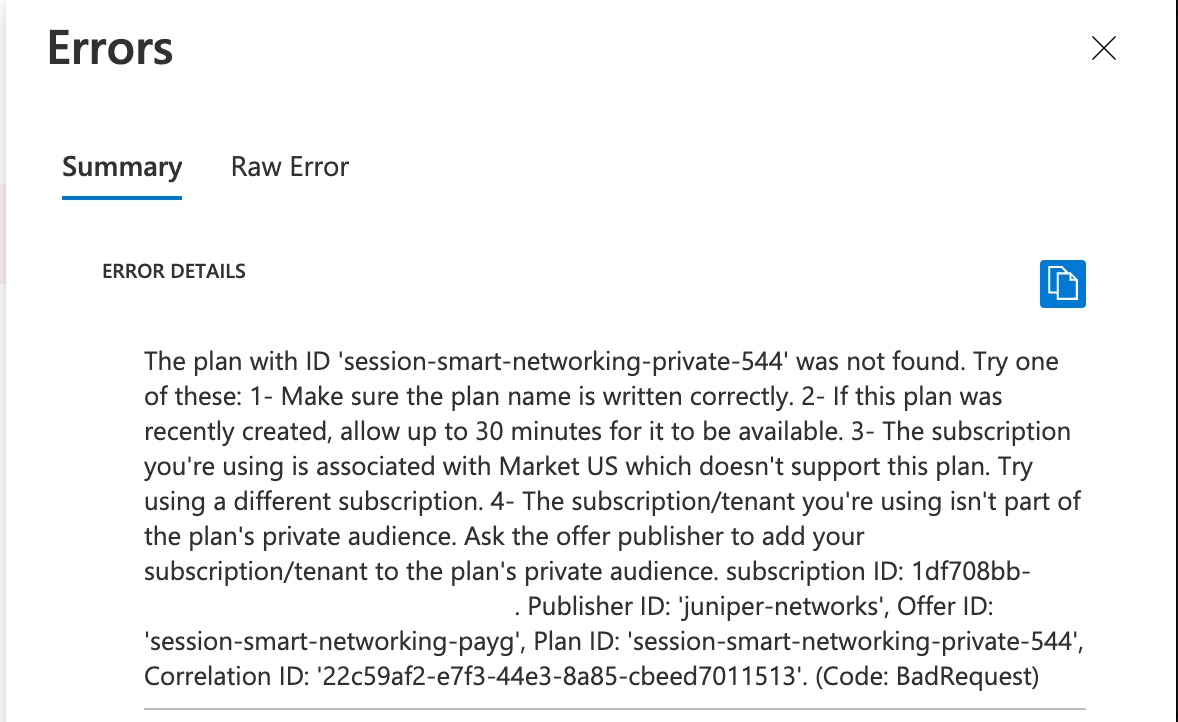
If the validation process fails with the error shown below, please make sure you are deploying the version of the software Juniper has allowlisted to your Subscription ID and try again later. If the problem persists, please contact your Juniper representative.
Once the deployment completes, information is provided in the Outputs tab on the left hand side.
If the Session Smart Networking Platform offering selected for the deployment was a Private or an Hourly image, click on the HTTPS URL of the HTTPSLogin field to login to the Conductor GUI (In some cases when using Chrome, the self-signed certificate may return an unsafe connection. Click through the message.). The credentials are admin for username and the password is 128Tadmin. To login to the VM via SSH use the username and the SSH public key provided in the template. To retrieve the name of the asset-id, SSH to the Conductor VM and run the following command: sudo dmidecode | grep UUID
Be sure to change the password that conforms to your business' password requirements and criteria.
Azure CLI or PowerShell
To deploy the Session Smart Networking software via Azure CLI or PowerShell:
Click on the Session Smart Networking Platform offering selected during the previous section Selecting the Azure plan. Click on the Get it now button. Agree to the terms of use and privacy policy of the image. Click on the Get started button to enable programmatic deployment for the subscription and click the button Save to save the changes.
![]()
Click on the tab Plans + Pricing as shown in the following picture:
![]()
Lastly copy to the clipboard the URL of the Juniper Session Smart Conductor template located in the field URL that better suits your needs.
Create the parameters file, accept the terms of use and conditions of the image. Launch the deployment with the corresponding Azure CLI or PowerShell commands making use of the URL of the template identified previously. For additional information see Launch the Template.
If the validation process fails with the error shown below, please make sure you are deploying the version of the software Juniper has allowlisted to your Subscription ID and try again later. If the problem persists, please contact your Juniper representative.
Once the deployment completes, information is provided in the Outputs tab on the left hand side:
- If the Session Smart Networking Platform offering selected for the deployment was a Private or an Hourly image, click on the HTTPS URL of the
HTTPSLoginfield to login to the Conductor GUI (In some cases when using Chrome, the self-signed certificate may return an unsafe connection. Click through the message.). The credentials areadminfor username and the password is128Tadmin. To login to the VM via SSH use the username and the SSH public key provided in the template. To retrieve the name of the asset-id, SSH to the Conductor VM and run the following command:sudo dmidecode | grep UUID
Be sure to change the password that conforms to your business' password requirements and criteria.
Proceed to the next section Session Smart Router Deployment to deploy a Session Smart Router.
Session Smart Router Deployment
Requirements
The following infrastructure must exist in your Azure subscription:
- A VNet where the Session Smart Router (SSR) will be deployed.
- An Availability Set where the SSR will be deployed.
- The existing VNet is segmented with at least three subnets. The role of each subnet is described below:
- Public subnet. The expectation is that this subnet provides connectivity to enable communication with external/remote SSR peers.
- Private subnet. The expectation is that this subnet provides connectivity to internal workloads within the cloud.
- Management subnet. The expectation is that this subnet meets the following capabilities:
- The subnet is reachable for SSH for administration purposes.
- The interface of the Conductor that is going to manage this router must be reachable from this subnet.
Please note that deploying Session Smart Routers without a valid token or certificate will be limited to deployments within the cloud only. If your use case requires the deployment of an SSR on your premises as well, please contact your Juniper Sales representative.
Deployment
A Session Smart Router can be deployed manually via the Azure Portal or in an automated fashion using Azure CLI or PowerShell commands. This section describes both methods. Choose the method that better suits your needs.
When deploying the Session Smart Router using the templates referenced in this section, the following infrastructure elements are created automatically to assist with the deployment process:
- Virtual machine using a Session Smart image available in the marketplace.
- The router is deployed with three network interfaces: public, private and management interfaces.
- Each network interface has a network security group associated. The network security groups are configured in accordance with the requirements to deploy a fabric with Session Smart Networking software.
- The public and management interfaces have a unique and static public IP address associated.
The following image shows the infrastructure elements deployed:

Azure Portal
To deploy the Session Smart Networking software via the Azure Portal:
- Click on the Session Smart Networking Platform offering selected during the previous section Selecting the Azure plan.
- Click on the Get it now button.
- Agree to the terms of use and privacy policy of the image.
- Click on the tab Plans + Pricing as shown in the following picture:
![]()
- Click the Launch link of the Mist-managed template.
Answer the following 4 questions to launch the deployment of an SSR .For additional information see Launch the Template.
- What name do you want to give it?
- Provide the name in the Instance Name field (for example:
128TRouter).
- Provide the name in the Instance Name field (for example:
- Where do you want to deploy it?
- Provide the location where the VNet exists in the Location field (for example: eastus). All available Azure locations. Note the name of the Location field is one word and all lowercase; for example,
eastus,westus,westeurope,eastasia. - Provide the name of the VNet in the Virtual Network Name field (for example: 128T-VNet).
- Provide the name of the availability set in the Availability Set Name field (for example: 128TRouterSet).
- Provide the name of the public, private and management subnets in the Public Subnet Name, Private Subnet Name and Management Subnet Name fields respectively (for example: wan, lan and default).
- Provide the location where the VNet exists in the Location field (for example: eastus). All available Azure locations. Note the name of the Location field is one word and all lowercase; for example,
- Which Session Smart Conductor is going to manage it? Provide the IP address of the primary node of Conductor in the Conductor Primary Control IP field, and only if the Conductor is highly available then provide the IP address of the secondary node of Conductor in the Conductor Secondary Control IP field. Please check the public IP address assigned to the Session Smart Conductor deployed in the previous section.
- Who is going to be the administrator?
-
Provide a username (for example:
t128) and the content of your public SSH key in theAdmin UsernameandAdmin Public Key Datafields respectively. -
Agree to the terms of use and conditions of the deployment.
-
Click the Purchase button to launch the deployment.
Once the deployment completes, information is provided in the Outputs tab on the left hand side:
- If the Session Smart Networking Platform offering selected for the deployment is a Private image, and IP address/es to an existing Conductor have been provided in the template, the non-interactive, Zero Touch Provisioning (ZTP) method is triggered. After the VM is deployed, an additional 2-3 minutes are required before the ZTP process initializes. When the ZTP process is ready, there will be an asset in the Conductor to be associated with the router configuration. To retrieve the name of the asset-id, SSH to the router VM and run the following command:
sudo dmidecode | grep UUID. To login to the instance via SSH, use the username and the SSH public key provided in the template. Then, login to Conductor via HTTPs to associate the pending asset with the configuration of the router. If the asset is not associated with a router, an unmanaged router will be deployed, and must be initialized manually.
Azure CLI or PowerShell
To deploy the Session Smart Networking software using the Azure CLI or Powershell:
- Click on the Session Smart Networking Platform offering selected during the previous section Selecting the Azure plan.
- Click on Get it now.
- Agree to the terms of use and privacy policy of the image.
- Click on Get started to enable programmatic deployment for the subscription, then click Save.
![]()
- Click on the tab Plans + Pricing as shown in the following picture:
![]()
- Copy the URL of the template located in the field URL that best suits your needs.
- Create the parameters file.
- Accept the terms of use and conditions of the image.
- Launch the deployment with the corresponding Azure CLI or PowerShell commands, making use of the URL of the template identified previously. For additional information see [Launch the Template]](#launch-the-template).
Once the deployment completes, information is provided in the Outputs tab on the left hand side.
If the Session Smart Networking Platform offering selected for the deployment is a Private image, and IP address/es to an existing Conductor have been provided in the template, the non-interactive, Zero Touch Provisioning (ZTP) method is triggered. After the VM is deployed, an additional 2-3 minutes are required before the ZTP process initializes. When the ZTP process is ready, there will be an asset in the Conductor to be associated with the router configuration. To retrieve the name of the asset-id, SSH to the router VM and run the following command: sudo dmidecode | grep UUID. To login to the instance via SSH, use the username and the SSH public key provided in the template. Then, login to Conductor via HTTPs to associate the pending asset with the configuration of the router. If the asset is not associated with a router, an unmanaged router will be deployed, and must be initialized manually.
Network Interfaces Layout
The Session Smart Router Template deploys a VM for the SSR with three network interfaces. The template attaches the network interfaces to the VM in the following order: Management, Public, and Private. The network interfaces are mapped as follows:
| Network interface name | Subnet |
|---|---|
| eth0 | Management |
| eth1 | Public |
| eth2 | Private |
With the release of 5.0, device interfaces are mapped using the VMBus UUID; use of the PCI addresses is no longer supported. Use the following process to map the VMBus UUID to the device interfaces.
Configuring a Device Interface with VMBus UUID
The following are the high level steps to configure a device interface on an SSR running in the Azure cloud.
- Determine the Device Interface Layout
- Configure and Assign the VMBus UUID Identifier to a Device Interface
- Verify Connectivity
If you are upgrading the SSR software from a version prior to 5.0, repeat this procedure for each router running on Azure.
Determine the Device Interface Layout
-
Identify the VMBus UUID address associated with each device interface on the Linux VM.
a) Login via SSH to the VM corresponding to the SSR.
b) Run the following command in Linux:
sudo dpdk-devbind.py --statusIn the VMBus devices section, the VMBus UUID is the first column (outlined below in red). The parameter
if(outlined below in green) is the name of the associated device interface in Linux.
-
Identify the Azure mapping of each device interface.
a) Login to the Azure portal.
b) Click on the name of the VM of the router.
c) Select Networking under the Settings section on the left side of the interface.
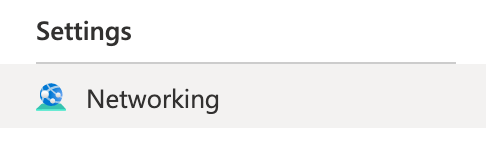
d) The device interfaces attached to the VM are shown.
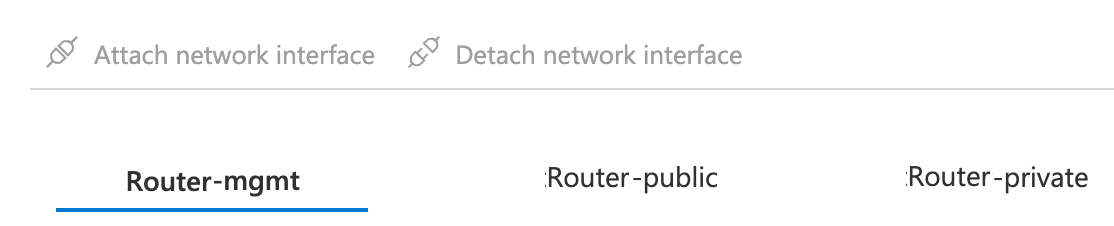
From left to right, the interfaces are: Router-mgmt (management interface), Router-public (WAN interface), and Router-private (LAN interface).
In this example, the Session Smart Router Template assigned the Linux interfaces to eth0, eth1, and eth2 respectively.
-
Use the information gathered from the Azure portal (Router-mgmt, Router-public, Router-private) and the output from the
sudo dpdk-devbind.py --statuscommand to determine the VMBus UUID, as shown in the following table.
| Device Interface Name (Linux) | Subnet | VMBus UUID |
|---|---|---|
| eth0 | mgmt | -4e97000d3a04 |
| eth1 | public | -efd3000d3a04 |
| eth2 | private | -e5e2000d3a04 |
Assign the VMBus UUID Identifier to a Device Interface
Assign the VMBus UUID to a device interface using the CLI.
- Login to the CLI on the Conductor.
- Run the following commands to configure a device interface with a VMBus UUID on a router:
configure authority router <router name> node <node name> device-interface <device interface name>
type ethernet
forwarding true
vmbus-uuid <device interface vmbus uuid>
top
-
Repeat the steps above for each device interface and router running on Azure.
-
Validate and commit the changes.
validate
commit
Verify Connectivity
-
Login via SSH to the VM of each router running on Azure.
-
Login to the SSR CLI.
su admin -
Ping the gateway of each device interface.
ping <gateway IP address> -
Azure gateways do not reply to ping, but you can verify connectivity by checking the ARP table on the SSR. Use
show arpto display the ARP table, and look for valid entries.
Troubleshooting
Validation Process Failure
If the validation process fails with the error shown below, please verify you are deploying the version of the software Juniper has allowlisted to your Subscription ID and try again later. If the problem persists, please contact your Juniper representative.
Device Does Not Exist In Mist after ZTP
If the device does not show up in the Mist org after 5 minutes, ssh into the instance through the Azure portal.
-
Log into the pcli, run
su adminand thenshow mist. -
If the status and action necessary is not obvious, drop back to the linux shell and look at the journal for the bootstrapper:
journalctl -u 128T-hardware-bootstrapper
And the Mist agent:
journalctl -u 128T-mist-agent
Annexes
Agree to the Terms of Use and the Privacy Policy
To agree to the Terms of Use and the Privacy Policy for the Session Smart Networking image used, click on Get It Now as shown in the following image:

Click on Continue in order to agree to the Terms of Use and the Privacy Policy.
To deploy the Session Smart Networking software programmatically, you must enable Programmatic Deployment and accept its Terms of Use. If Programmatic Deployment is desirable, please click on the Get started button located under the Create button as shown in the image below:
![]()
Finally, select the subscription you want and click on Save to apply the changes.
Alternatively, it is possible to accept the term of use and privacy policy programmatically. The PowerShell commands for each Session Smart Networking software image are shown next, please run the commands corresponding to the image you want to use:
- Session Smart Networking - Private Image:
Get-AzureRmMarketplaceTerms `
-Publisher "juniper-networks" `
-Product "session-smart-networking-payg" `
-Name "session-smart-networking-private-XYZ" `
| Set-AzureRmMarketplaceTerms -Accept
Replace the XYZ placeholder right in the command above with the version of the Session Smart Software to be deployed. For example, if the version to deploy is 5.4.4, then replace XYZ with 544
Load the Template
After the Terms of Use and the Privacy Policy have been accepted, select the Plan tab. The available templates are listed there.
When you select a template, a new tab opens in the browser that redirects you to the template.
As an additional note and only applicable when the chosen image is the Session Smart Networking Platform, please be aware of the following conditions before using any of its templates:
- Applicable when deploying an Session Smart Router:
- If there is an existing Session Smart Conductor in the network and the intent is to perform a non interactive installation of an SSR (for example a ZTP installation) please make sure the certificate provided by Juniper has been imported and loaded in Session Smart Conductor before launching the template to deploy the SSR.
Launch the Template
This section describes how to fill out and launch the template via the portal and programmatically to deploy a Session Smart Conductor and SSR.
Session Smart Conductor
This section describes the parameters to fill out the template to deploy a Session Smart Conductor as well as how to launch it via the portal and programmatically.
A description of the parameters of the template are listed in the following table:
| Parameter | Description |
|---|---|
| Subscription | Subscription for the deployment. |
| Resource group | Select an existing resource group or create a new one. |
| Region | The first instance of the Region field is automatically populated with the region corresponding to the resource group. |
| Instance Name | Fill out the Instance Name field to provide a name to the VM for the Conductor. |
| Location | As indicated in the requirements, the Conductor is going to be deployed into an existing VNet. The Location field is the name of the location where such VNet exists. Please refer to the following list https://azure.microsoft.com/en-us/global-infrastructure/locations (the name of the Location field is one word and all lowercase). Example: eastus, westus, westeurope, eastasia.. |
| Virtual Network Name | Name of the existing VNet where the Conductor is going to be deployed to. |
| Control Subnet Name | The name of the control subnet within the VNet. |
| Control Allowed CIDR | It is used to define a trusted source IP address range which represents the source IP addresses of the management interface of the SSRs to be managed. Connections originated from source IP addresses which are outside the range are not allowed, effectively protecting the Control Subnet. It is common to set this field to 0.0.0.0/0 (accepting traffic from all source IP addresses) for now, as the source IP addresses of the SSRs may not be known at this time. However, after the deployment and once these external IP addresses are known, it may be desirable to provision them explicitly in the corresponding security groups to increase the degree of security. |
| Instance size | Size of the VM. |
| Admin Username | The desired username to login to the VM (Linux) via SSH. |
| Admin Public Key Data | Paste in this field the SSH public key to be used to authenticate with the VM (Linux) instance via SSH. The key needs to be at least 2048-bit and in ssh-rsa format. Please find the following an example of a valid key next (To reduce the length of the key in this example multiple character have been replaced by three dots): ssh-rsa AAAAB3NzaC1yc2EAAAADAQABAAACAQDHwB1Qe1KndGqKuT3F...GumfdHfdasy8N0kncMtp2wtkqoLsRWdJ4/WKaZBOrPd4Q== admin@Admin-MacBook-Pro.local. For more information about creating ssh keys see Create SSH keys on Linux and Mac for Linux VMs in Azure. |
| Admin Allowed CIDR | It allows for restricting reachability to the control interface of the Conductor to a well known source IP address CIDR range for management purposes. It is common to set this field to 0.0.0.0/0 (accepting traffic from all source IP addresses) for now, as the source IP address/es where the Conductor will be administered from may not be known at this time. However, once the deployment completes, it is highly recommended to update the configuration of the network security group to allow only access from the source IP address/es where the Conductor will be administered. |
Azure Portal
- Click on the Session Smart Networking Platform offering selected during the previous section Selecting the Azure plan.
- Click on the Get it now button.
- Agree to the terms of use and privacy policy of the image.
- Click on the tab Plans + Pricing as shown in the following picture:
![]()
- Click on the Launch link of the Juniper Session Smart Conductor template that better suits your needs.
- Agree to the terms of use and conditions of the deployment.
- Click on the Purchase button to launch the deployment.
Once the deployment of the template is complete, information about the new Conductor deployment is provided in the Output tab.
The information listed in the Outputs tab is the following:
- Name of the VM instance.
- Public IP address for administration purposes.
- HTTPs URL to login to the Conductor GUI. Please continue to the end of this section below for more information regarding the credentials to login.
- SSH command to login to the Linux VM. Please continue to the end of this section below for more information regarding the credentials to login.
When logging to the Linux instance via SSH make use of the username specified in the Admin Username field and the corresponding private key specified in the Admin Public Key Data field.
If a Conductor template of a Private or Hourly image was used, you can login to the application via HTTPs as indicated in the HTTPSLogin fields respectively, the username is admin and the password is 128Tadmin.
Azure CLI or PowerShell
Alternatively, it is possible to launch the template programmatically. Please adjust the content of the JSON file below to match the input of each template:
Create the parameters file conductor_private.parameters.json with the following command:
vi conductor_private.parameters.json
and paste the following JSON content, please adjust the values to your specific environment:
{
  "$schema": "https://schema.management.azure.com/schemas/2015-01-01/deploymentParameters.json#",
  "contentVersion": "1.0.0.0",
  "parameters": {
    "instanceName": {
      "value": "<instance name>"
    },
    "location": {
      "value": "<location of the VNet>"
    },
    "virtualNetworkName": {
      "value": "<name of the VNet"
    },
    "controlSubnetName": {
      "value": "<name of the subnet>"
    },
    "controlAllowedCidr": {
      "value": "0.0.0.0/0"
    },
    "instanceSize": {
      "value": "Standard_DS3_v2"
    },
    "adminUsername": {
      "value": "<username>"
    },
    "adminPublicKeyData": {
      "value": "<content of ssh-rsa key>"
    },
    "adminAllowedCidr": {
      "value": "0.0.0.0/0"
    }
  }
}
- Go to the Session Smart Networking Platform offering following the steps described in the section Selecting the Azure plan.
- Click on the Get it now button.
- Agree to the terms of use and privacy policy of the image.
- Click on the Get started button to enable programmatic deployment for the subscription.
- Click the button Save to save the changes.
![]()
- Close the Configure Programmatic Deployment window.
- Click on the tab Plans + Pricing.
- Copy the URL of the Session Smart Router template located in the field URL to the clipboard.
- Launch the template running the following command:
New-AzResourceGroupDeployment -ResourceGroupName <your-resource-group-name> `
-TemplateUri <template-URL> `
-TemplateParameterFile ./conductor_private.parameters.json
When logging to the Linux instance via SSH make use of the username specified in the Admin Username field and the corresponding private key specified in the Admin Public Key Data field.
If a Conductor template of a Private or Hourly image was used, you can login to the application via HTTPs as indicated in the HTTPSLogin fields respectively, the username is admin and the password is 128Tadmin.
Session Smart Router
This section describes the parameters to fill out the template to deploy an SSR as well as how to launch it via the portal and programmatically.
A description of the parameters of the template are listed in the following table:
| Parameter | Description |
|---|---|
| Subscription | Subscription for the deployment. |
| Resource group | Select an existing resource group or create a new one. |
| Region | The first instance of the Region field is automatically populated with the region corresponding to the resource group. |
| Instance Name | Provide a name to the VM for the Session Smart Router. |
| Router Name | Provide a name to the Smart Router Router. Optional. |
| Node Name | Provide a name to the node of the Smart Router Router. Optional. |
| Location | As indicated in the requirements, the Session Smart Router is going to be deployed into an existing VNet. The Location field is the name of the location where such VNet exists. Please refer to the following list https://azure.microsoft.com/en-us/global-infrastructure/locations (the name of the Location field is one word and all lowercase). Example: eastus, westus, westeurope, eastasia... |
| Virtual Network Name | Name of the existing VNet where the Session Smart Router is going to be deployed to. |
| Availability Set Name | Name of the existing availability set within the same resource group and region as the VNet selected above the Session Smart Router is going to be deployed to. |
| Public Subnet Name | The name of the public subnet within the VNet. |
| Public Subnet Allowed CIDR | It corresponds to the source IP CIDR range of the SSR/s at the data center/branch (outside the cloud) allowed to originate traffic to the public interface of the router. This field allows for defining a well defined and trusted IP address range. It is common to set this field to 0.0.0.0/0 for now, as the source IP addresses of the routers at the data center or branch (outside the cloud) are not known at this time. However, after the deployment and once these external IP addresses are known it is recommended to provision them in the corresponding security groups to increase the degree of security. |
| Private Subnet Name | The name of the private subnet within the VNet. |
| Private Subnet Allowed CIDR | It corresponds to the source IP CIDR range of the internal workloads/endpoints allowed to originate traffic to the private interface of the router. This field allows for defining a well defined and trusted IP address range. By default is set to 0.0.0.0/0 to allow every workload/endpoint to communicate with the router. |
| Management Subnet Name | The name of the management subnet within the VNet. |
| Admin Allowed CIDR | It allows for restricting reachability to the management interface of the router to a well known source IP address CIDR range. By default is set to 0.0.0.0/0 allowing every IP address to reach the management interface. Once the deployment completes, it is highly recommended to update the configuration of the network security group to allow only access from the source IP address/es where the Session Smart Router will be administered. |
| Conductor Primary Control IP | If a Session Smart Conductor has already been deployed, fill out the field Conductor Primary Control IP with the IP address of the control interface of the primary node of Session Smart Conductor. The IP address of the control interface of Conductor should be reachable from the Management subnet selected above. It must be a valid IP address of the form x.x.x.x. If no Session Smart Conductor has been deployed yet or the intention is simply deploying an unmanaged router please refrain from entering any value in this field. |
| Conductor Secondary Control IP | If there is an existing Session Smart Conductor already deployed and the deployment of the Conductor is Highly Available, please enter the IP address of the control interface of the secondary node of Session Smart Conductor in the field Conductor Secondary Control IP. If the existing deployment of the Session Smart Conductor is not Highly Available, in other words if the Conductor is standalone, please refrain from entering any value in this field. |
| Instance size | Select the size of the VM in the field Instance Size. |
| Admin Username | Fill out the field Admin Username with the desired username to login to the VM (Linux) via SSH. |
| Admin Public Key Data | Paste in the field Admin Public Key Data the SSH public key to be used to authenticate with the VM (Linux) instance via SSH. The key needs to be at least 2048-bit and in ssh-rsa format. Please find the following an example of a valid key next (To reduce the length of the key in this example multiple character have been replaced by three dots): ssh-rsa AAAAB3NzaC1yc2EAAAADAQABAAACAQDHwB1Qe1KndGqKuT3F...GumfdHfdasy8N0kncMtp2wtkqoLsRWdJ4/WKaZBOrPd4Q== admin@Admin-MacBook-Pro.local. For more information about creating ssh keys, see Create SSH keys on Linux and Mac for Linux VMs in Azure. |
Azure Portal
- Click on the Session Smart Networking Platform offering selected during the previous section Selecting the Azure plan.
- Click on the Get it now button.
- Agree to the terms of use and privacy policy of the image.
- Click on the tab Plans + Pricing as shown in the following picture:
![]()
- Click on the Launch link of the Juniper Session Smart Router template that best suits your needs.
- Agree to the terms of use and conditions of the deployment.
- Click on the Purchase button to launch the deployment.
Once the deployment of the template is complete, information about the new router deployment is provided in the Output tab.
The information listed in the Outputs tab is the following:
- Name of the VM instance.
- Public IP address assigned to the management interface of the instance.
- SSH command to login to the Linux VM via the management interface.
When logging to the Linux instance via SSH make use of the username specified in the Admin Username field and the corresponding private key specified in the Admin Public Key Data field.
If a Conductor template of a Private or Hourly image was used, you can login to the application via HTTPs as indicated in the HTTPSLogin fields respectively, the username is admin and the password is 128Tadmin.
Azure CLI or PowerShell
Alternatively, it is possible to launch the template programmatically. Please adjust the content of the JSON file below to match the input of each template:
Create the parameters file router_private.parameters.json with the following command:
vi router_private.parameters.json
and paste the following JSON content, please adjust the values to your specific environment:
{
  "$schema": "https://schema.management.azure.com/schemas/2015-01-01/deploymentParameters.json#",
  "contentVersion": "1.0.0.0",
  "parameters": {
    "instanceName": {
      "value": "<instance name>"
    },
    "routerName": {
      "value": "<name to assign to the router. Optional>"
    },
    "nodeName": {
      "value": "<name to assign to the node of the router. Optional>"
    },
    "location": {
      "value": "<location of the VNet>"
    },
    "virtualNetworkName": {
      "value": "<name of the VNet>"
    },
    "availabilitySetName": {
      "value": "<name of the Availability Set>"
    },
    "publicSubnetName": {
      "value": "<name of the public subnet>"
    },
    "publicSubnetAllowedCidr": {
      "value": "0.0.0.0/0"
    },
    "privateSubnetName": {
      "value": "<name of the private subnet>"
    },
    "privateSubnetAllowedCidr": {
      "value": "0.0.0.0/0"
    },
    "managementSubnetName": {
      "value": "<name of the management subnet>"
    },
    "adminAllowedCidr": {
      "value": "0.0.0.0/0"
    },
    "conductorPrimaryControlIP": {
      "value": "<IP address of primary node of Conductor>"
    },
    "conductorSecondaryControlIP": {
      "value": "<IP address of secondary node of Conductor>"
    },
    "instanceSize": {
      "value": "Standard_DS3_v2"
    },
    "adminUsername": {
      "value": "<username>"
    },
    "adminPublicKeyData": {
      "value": "<content of ssh-rsa key>"
    }
  }
}
- Go to the Session Smart Networking Platform offering following the steps described in the section Selecting the Azure plan.
- Click on the Get it now button.
- Agree to the terms of use and privacy policy of the image.
- Click on the Get started button to enable programmatic deployment for the subscription.
- Click the button Save to save the changes.
![]()
- Close the Configure Programmatic Deployment window.
- Click on the tab Plans + Pricing.
- Copy the URL of the Session Smart Router template located in the field URL to the clipboard.
- Launch the template running the following command:
New-AzResourceGroupDeployment -ResourceGroupName <your-resource-group-name> `
-TemplateUri <template-URL> `
-TemplateParameterFile ./router_private.parameters.json
When logging to the Linux instance via SSH make use of the username specified in the Admin Username field and the corresponding private key specified in the Admin Public Key Data field.
If a Conductor template of a Private or Hourly image was used, you can login to the application via HTTPs as indicated in the HTTPSLogin fields respectively, the username is admin and the password is 128Tadmin.